
Selfie Lab Vancouver Review: A Cosplayer’s Honest Experience

Is a Selfie Studio Worth It for Cosplay Photos?
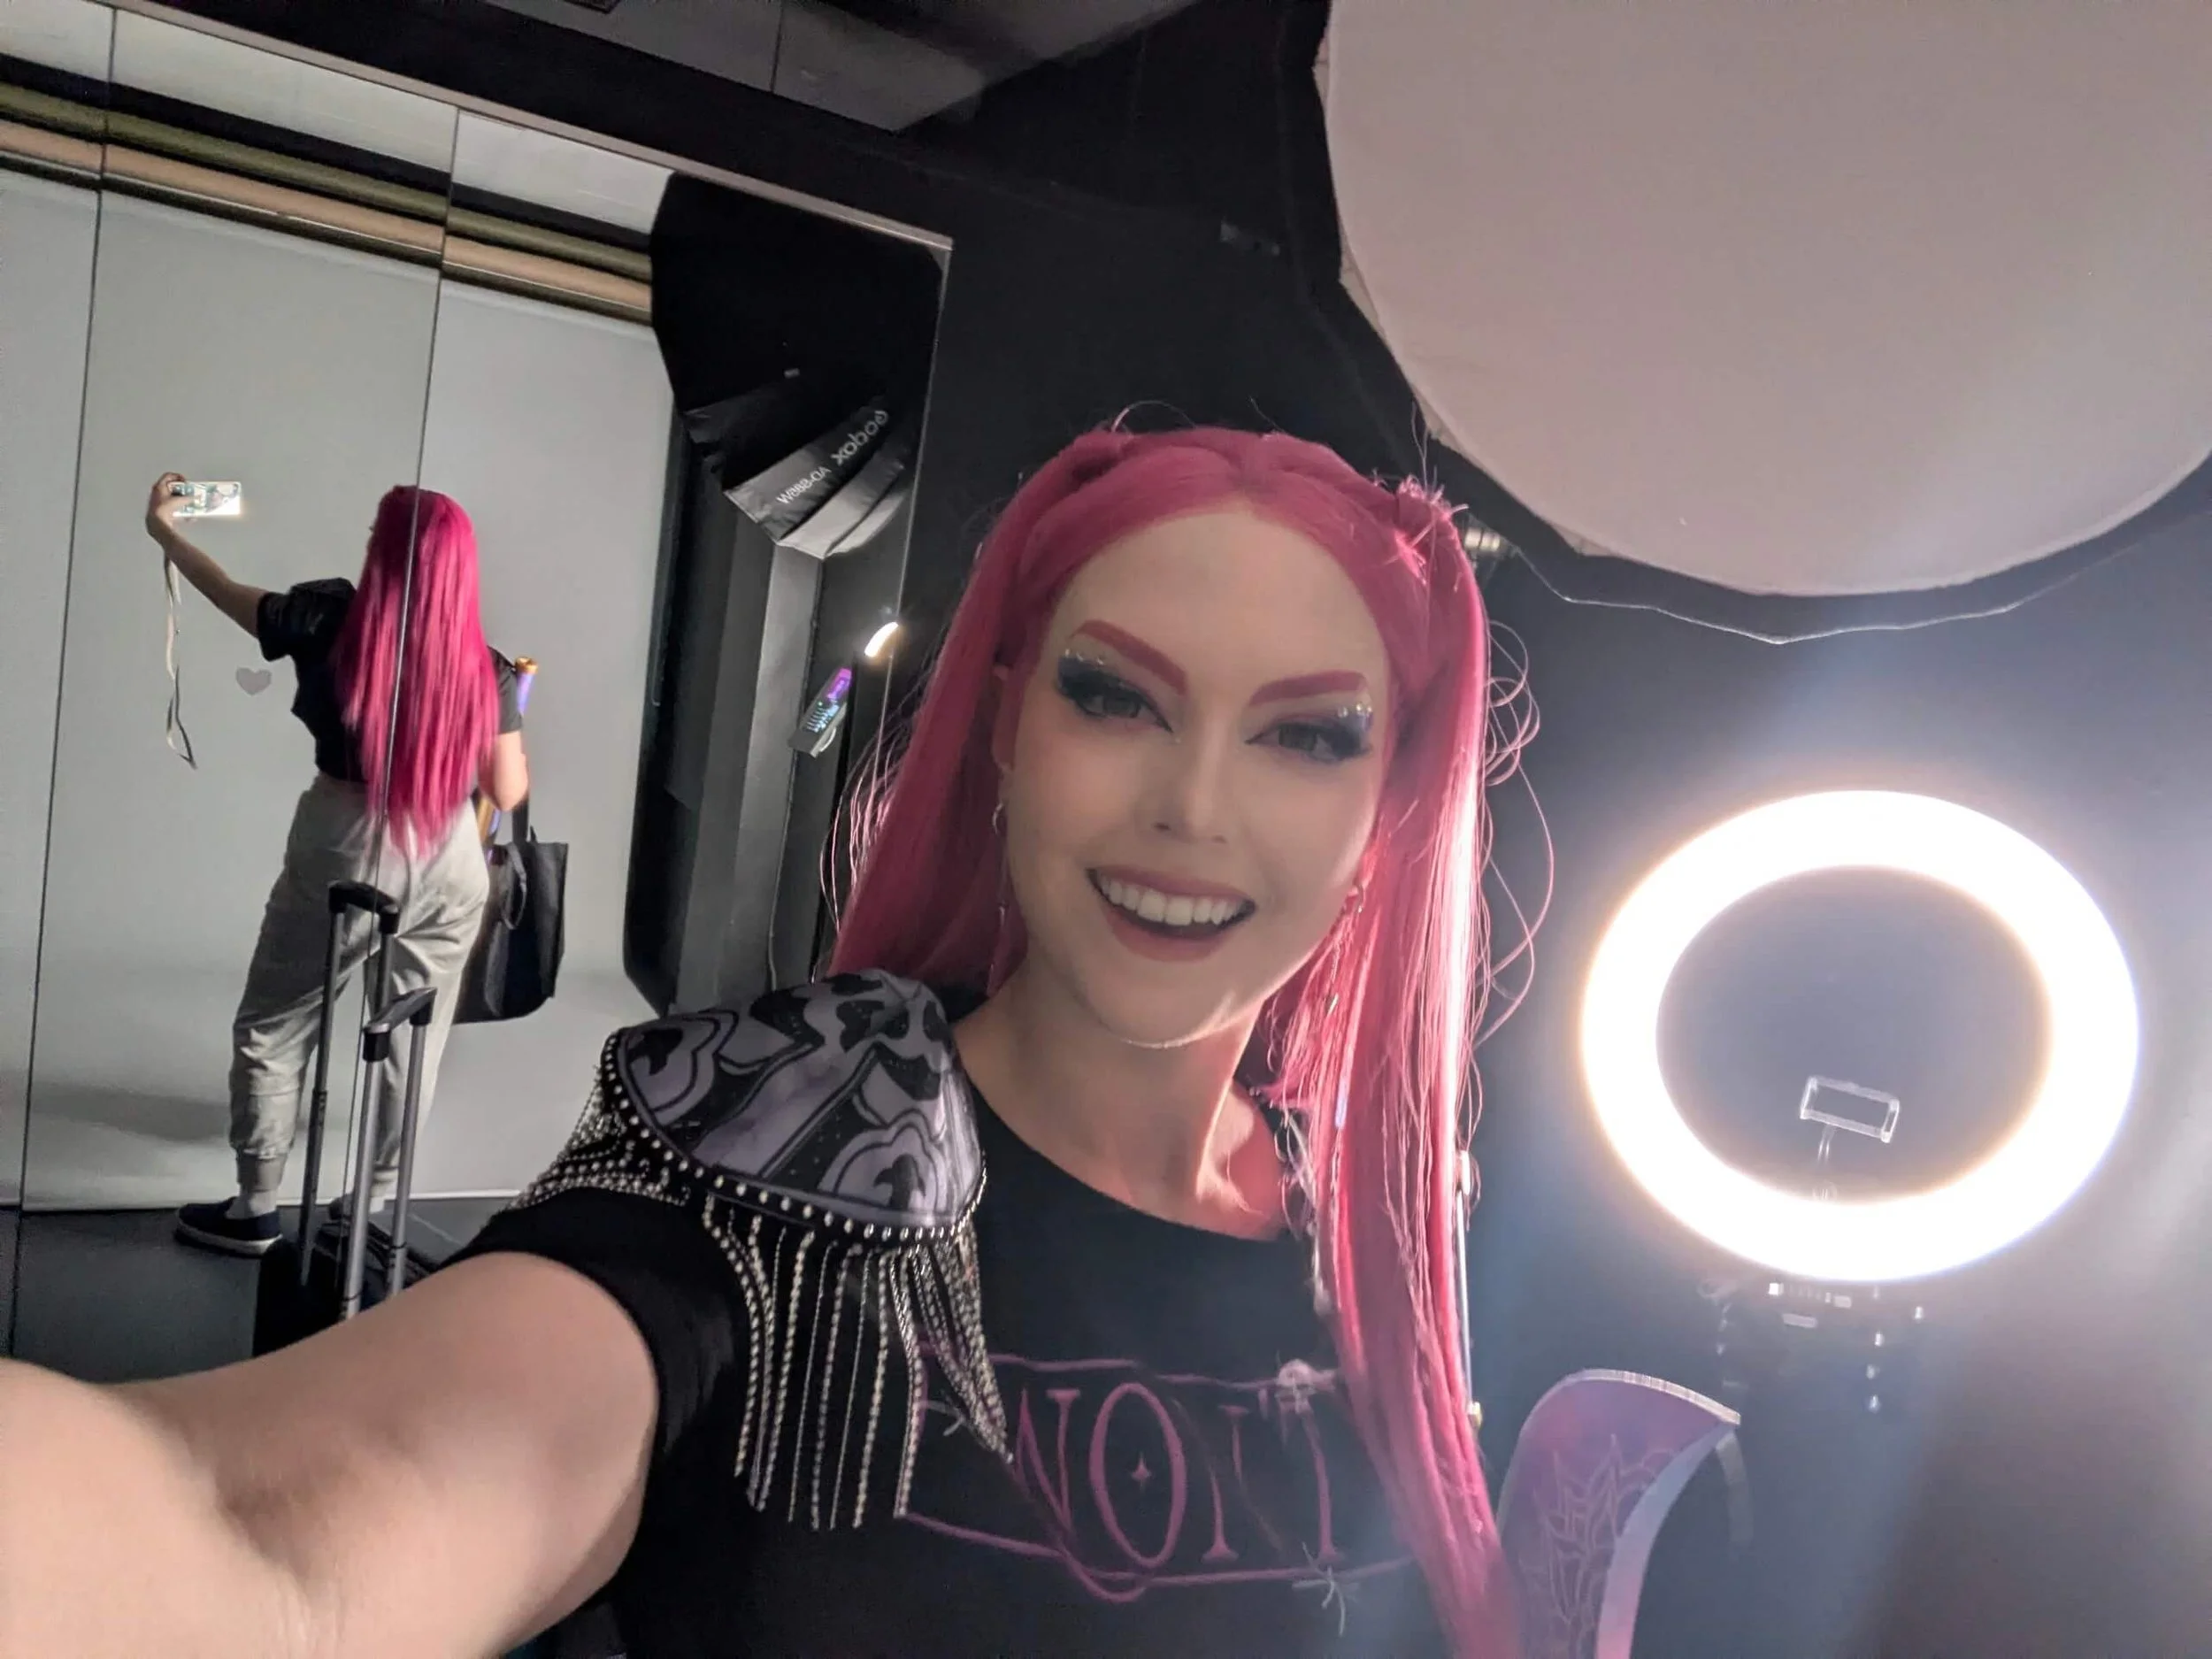
Selfie Lab invited me in to try their private studio for a 60 minute cosplay photoshoot, and I’ll be honest, I wasn’t totally sure what to expect.
No photographer.
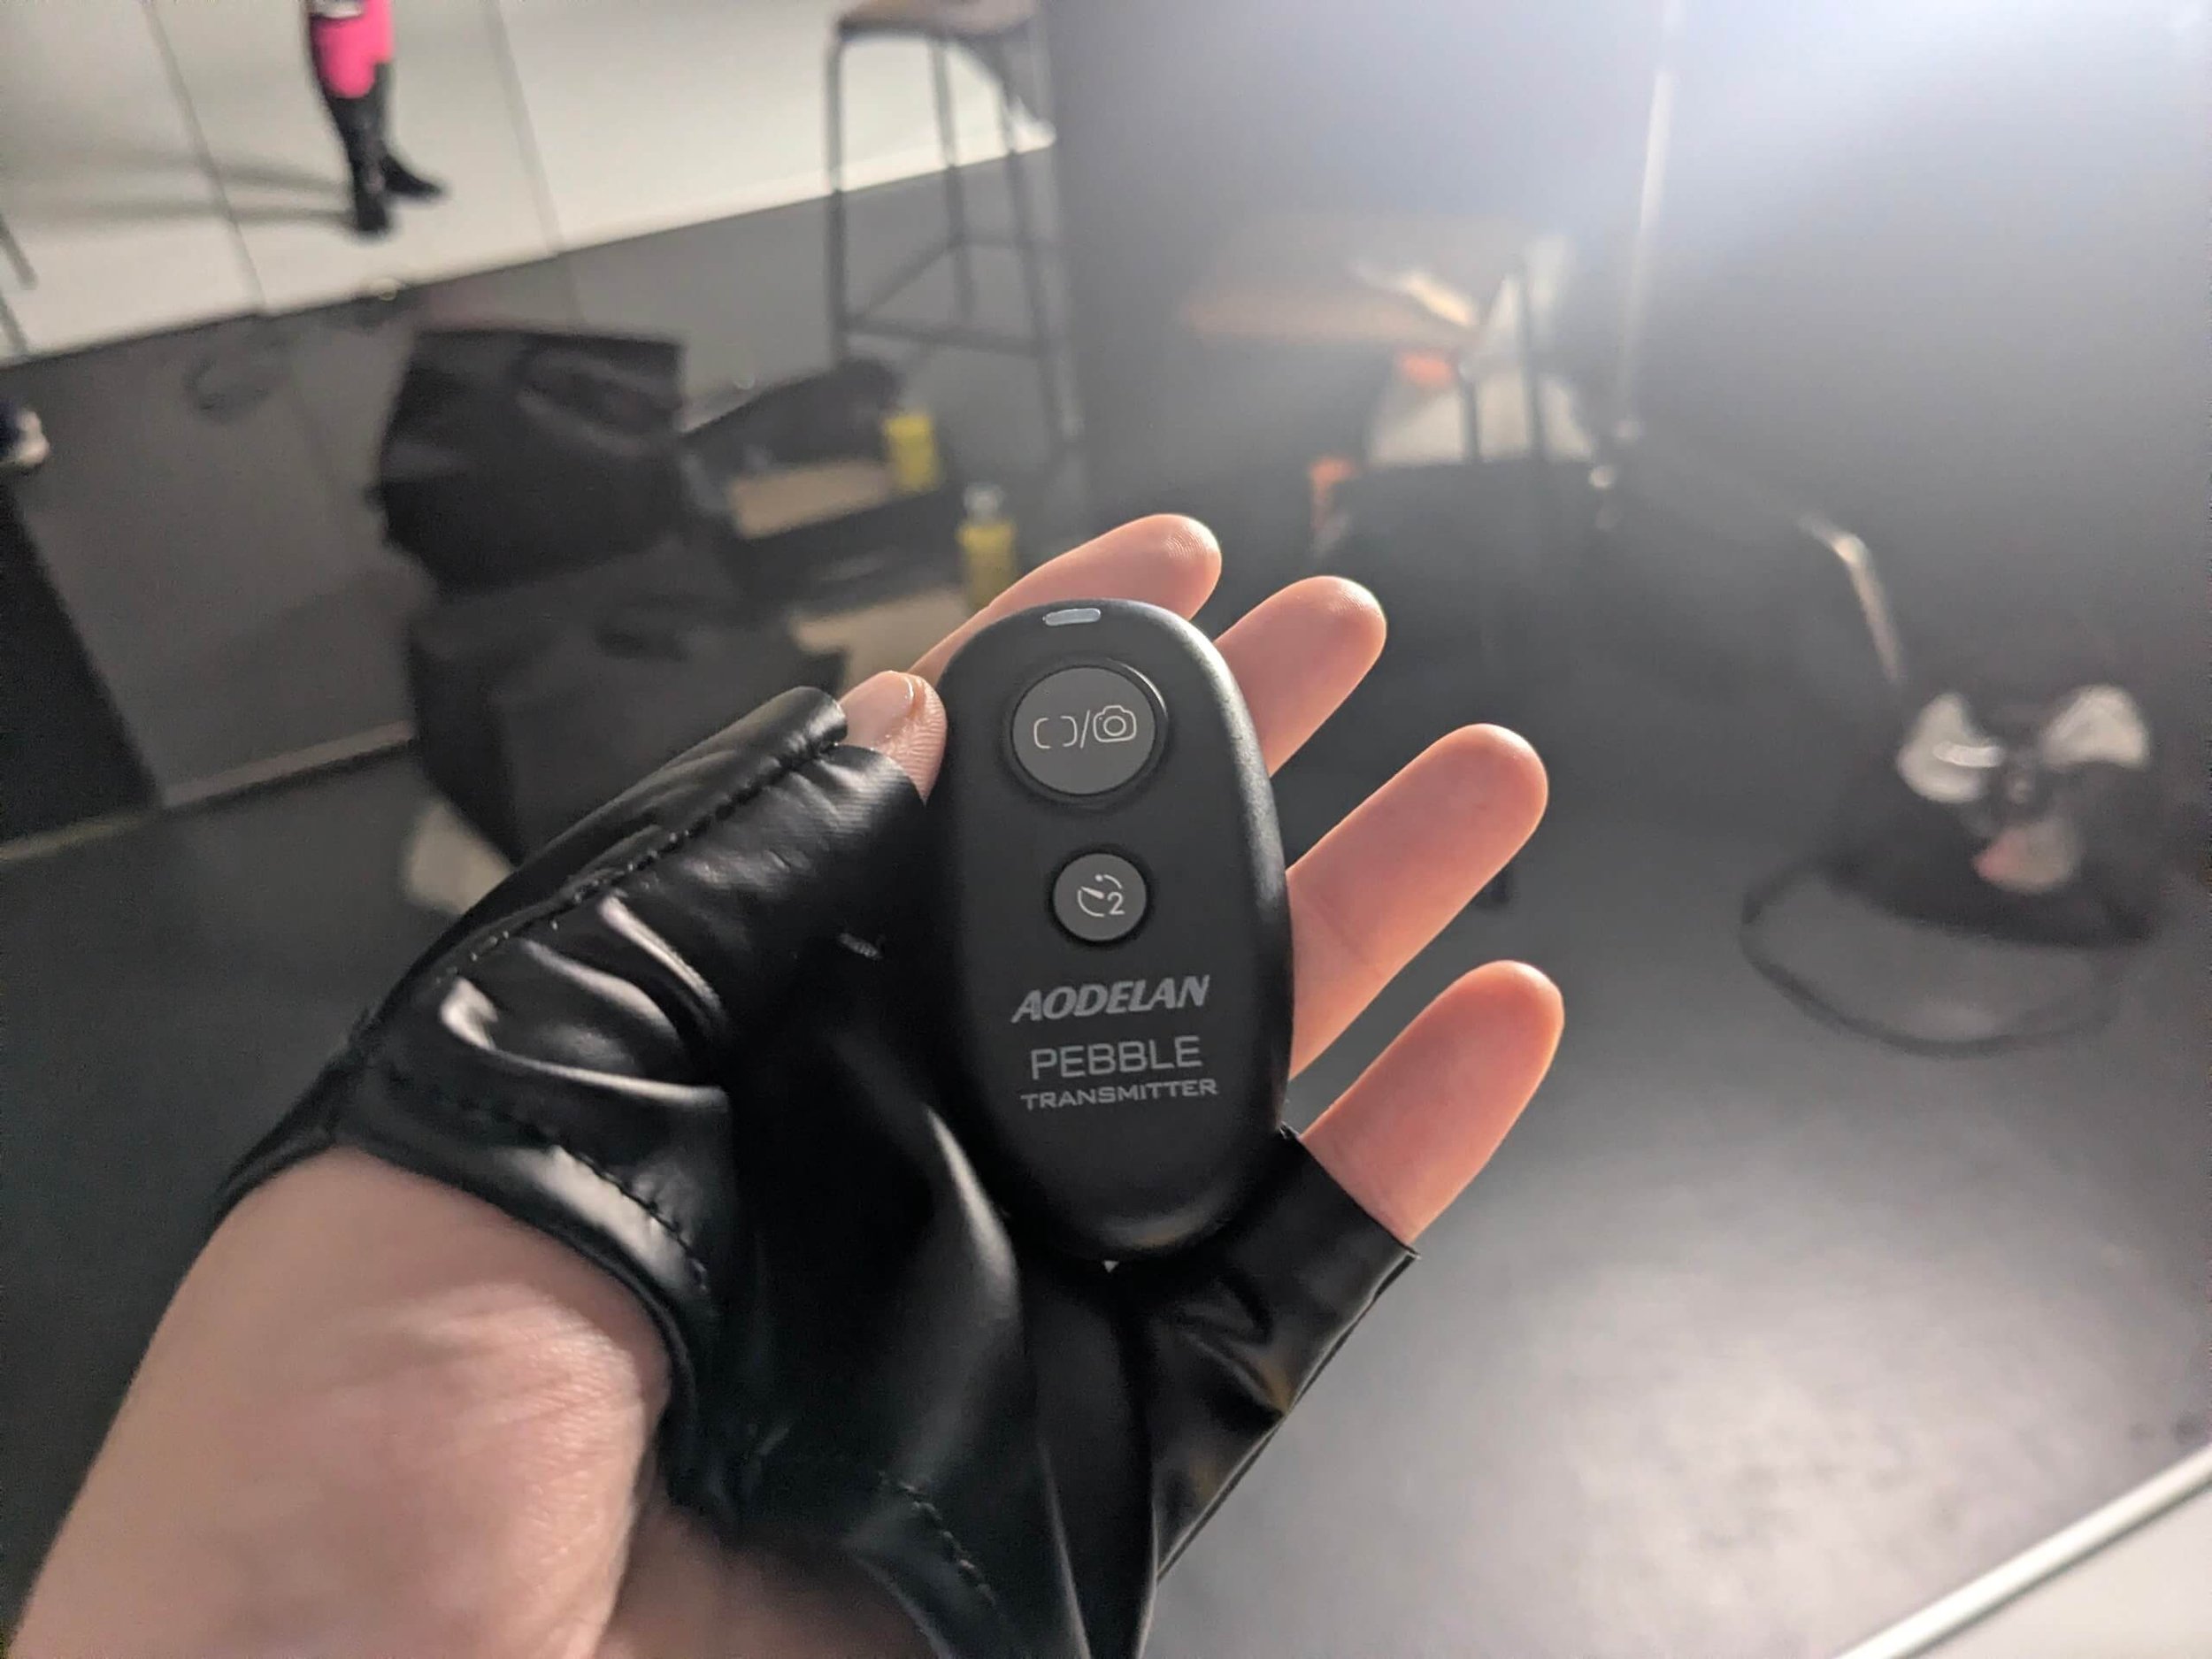
Just me, a clicker, and full creative control.
Which is either a dream… or chaos lol.
Spoiler: it ended up being one of the most fun and freeing shoots I’ve done!
What Is Selfie Lab (And Why Cosplayers Should Care)
If you’ve never heard of a selfie studio before, the concept is pretty simple.
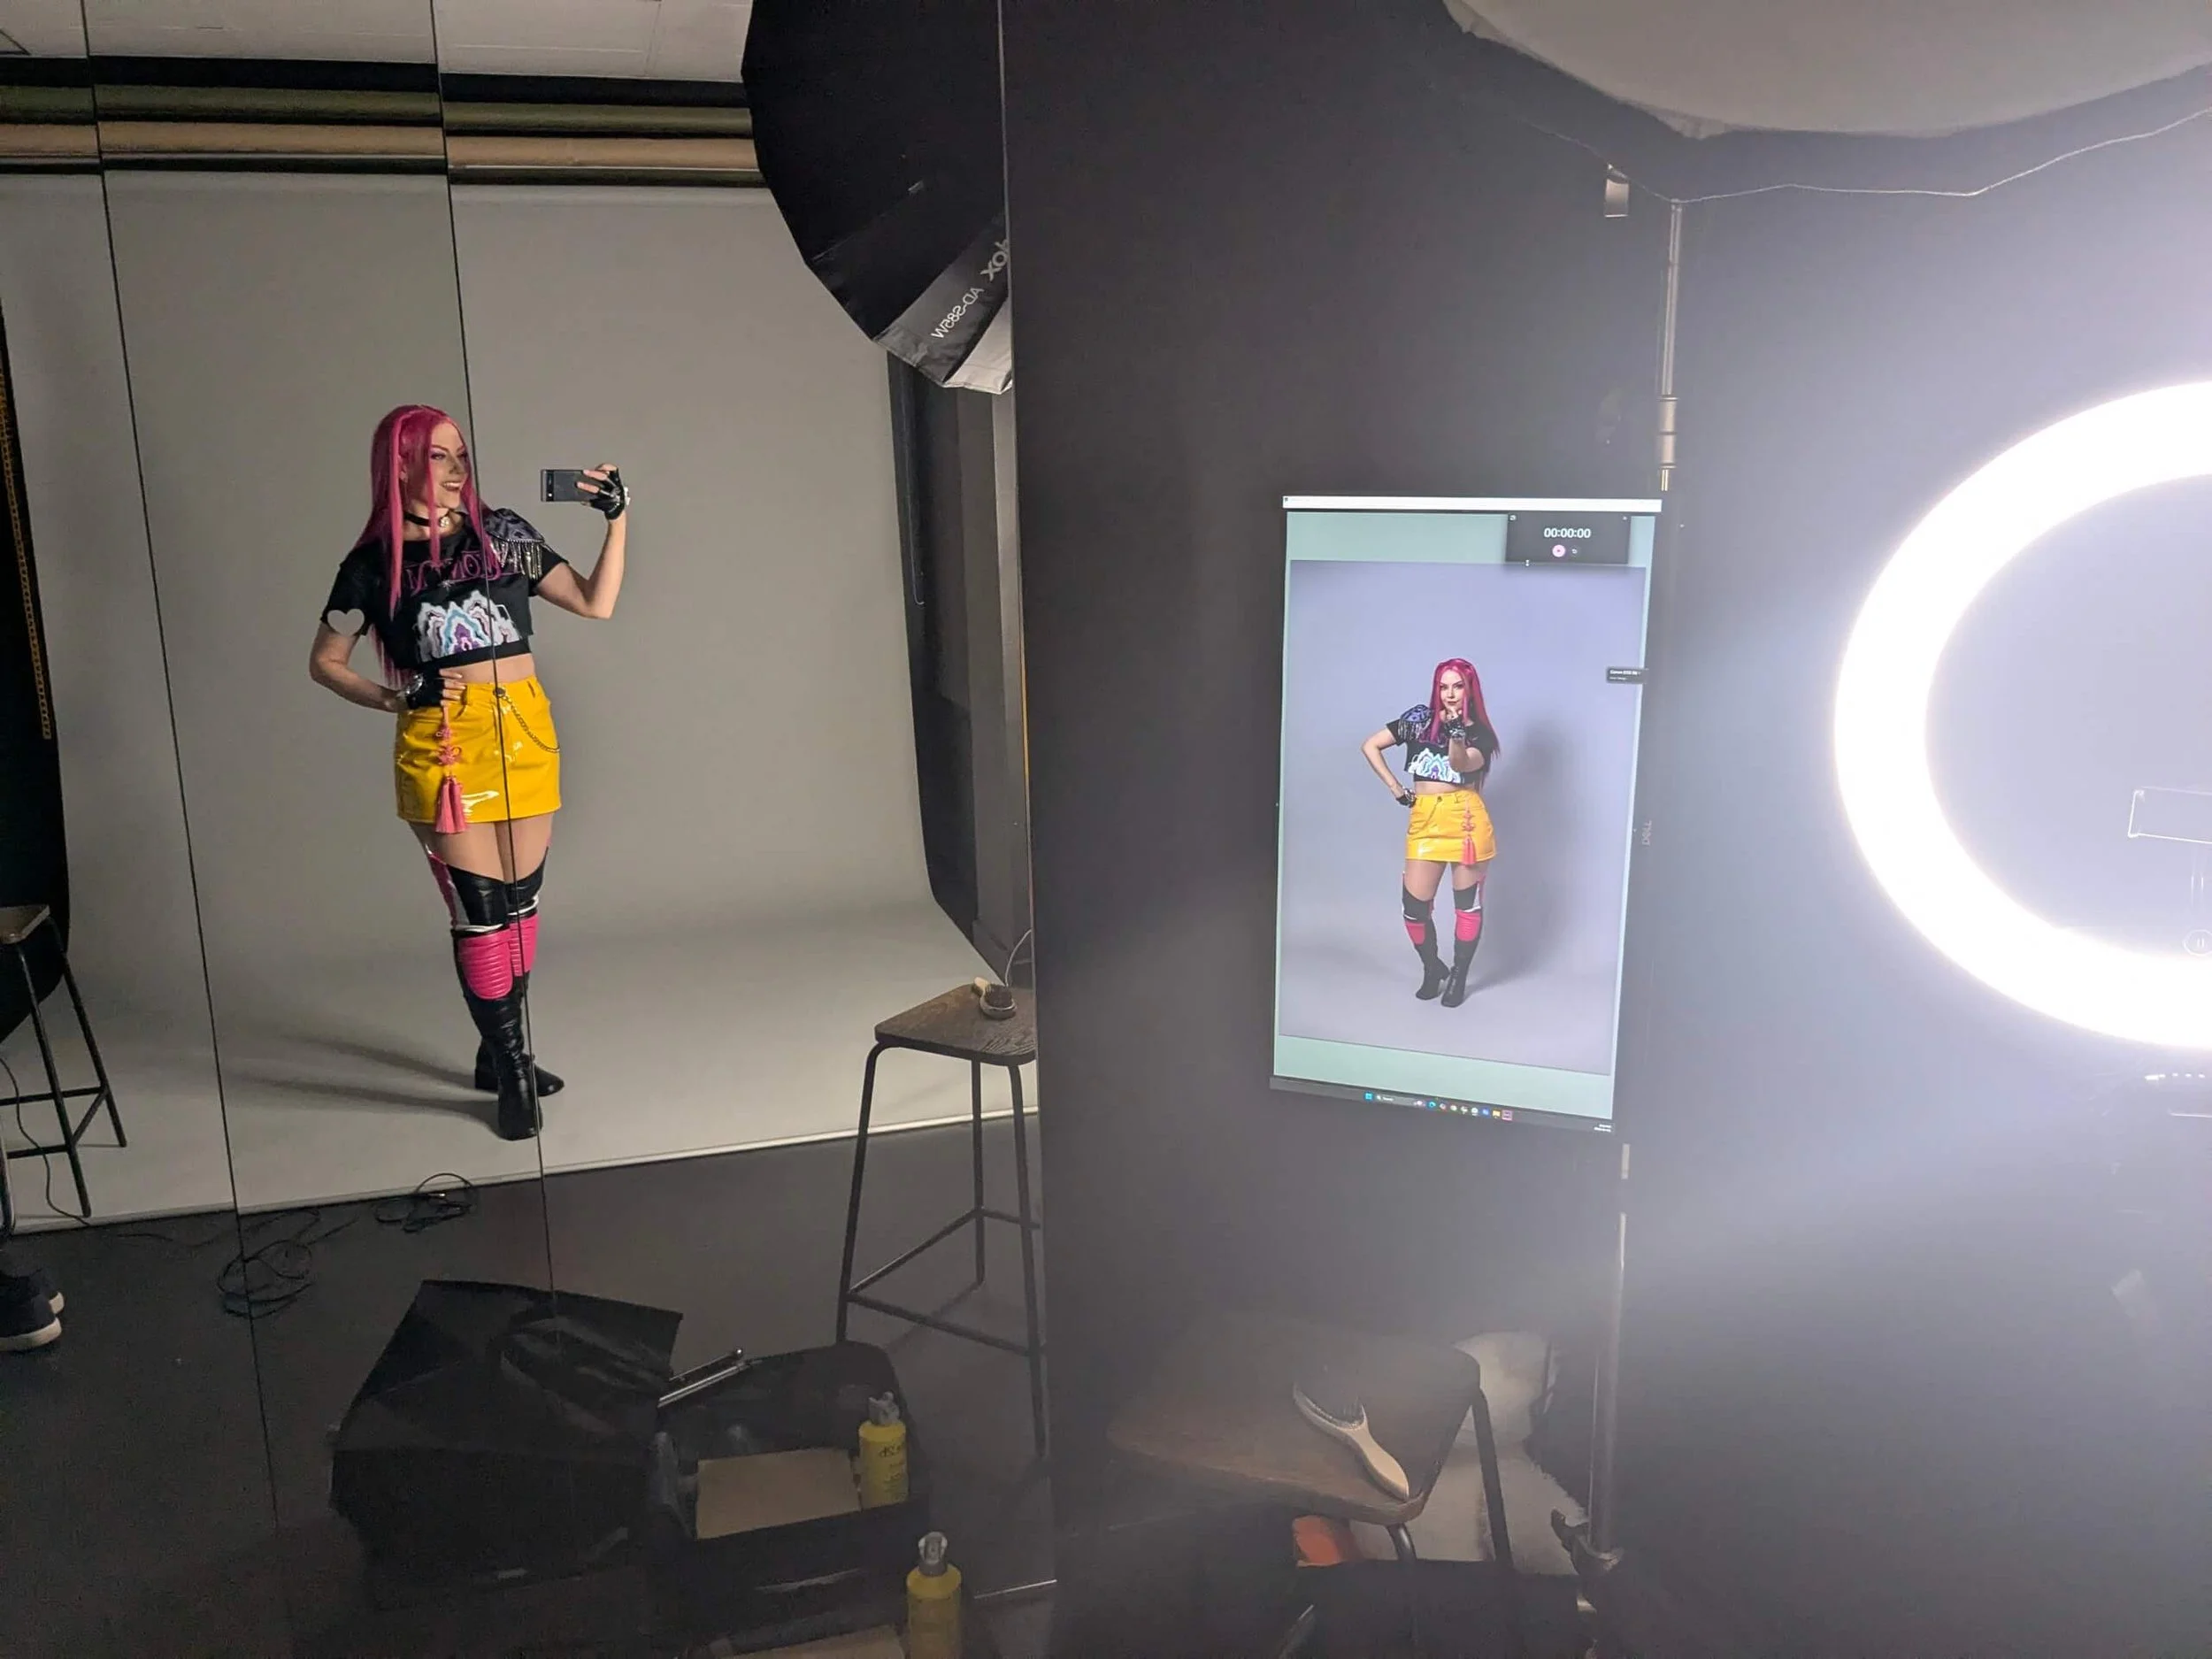
You book a private room, and inside is a full studio setup with lighting, backdrop, camera, and a preview screen. You control everything yourself using a remote clicker.
It has two buttons, and instant shot and a two second delay shot.
For cosplayers, this solves a couple problems/inconveniences:
No coordinating schedules with a photographer
No waiting on the weather
No pressure to be confident or perform in front of someone
No rushed convention shoots
No worrying about whether the photographer is happy with the images
No issues with copyright or using your photos
Just you, your costume, and time to experiment and (cos)PLAY!
My Cosplay Shoot Experience
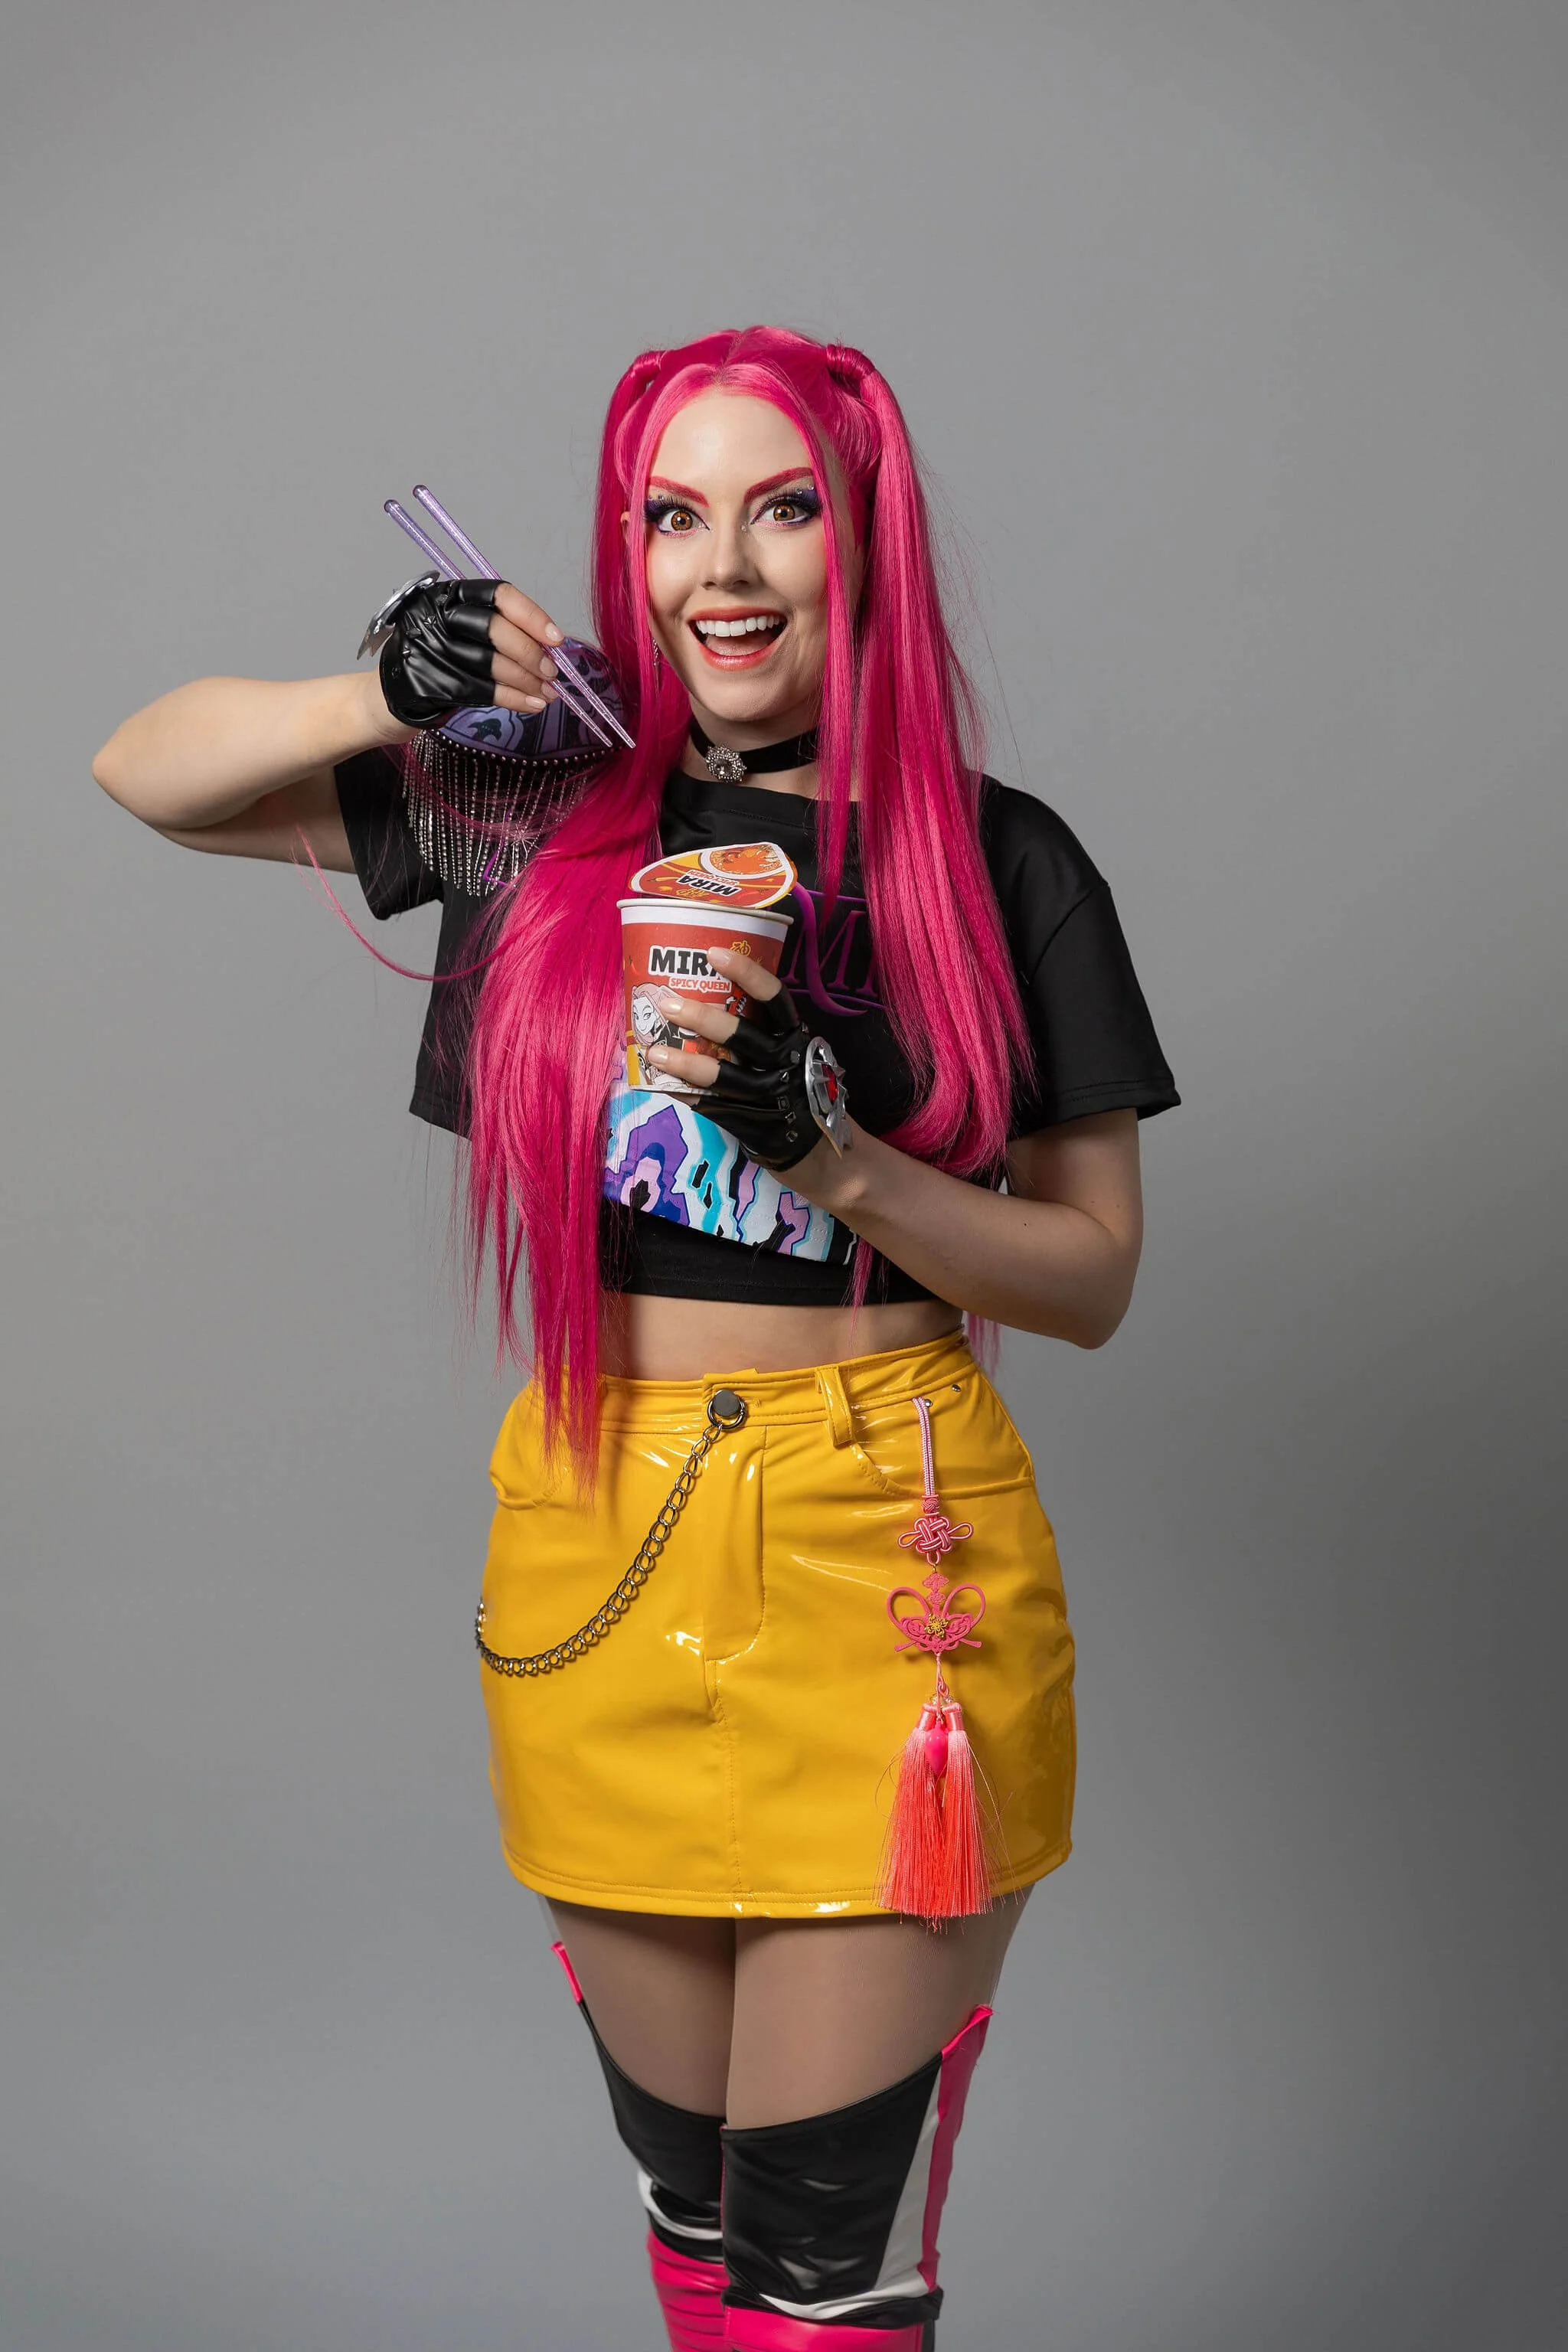
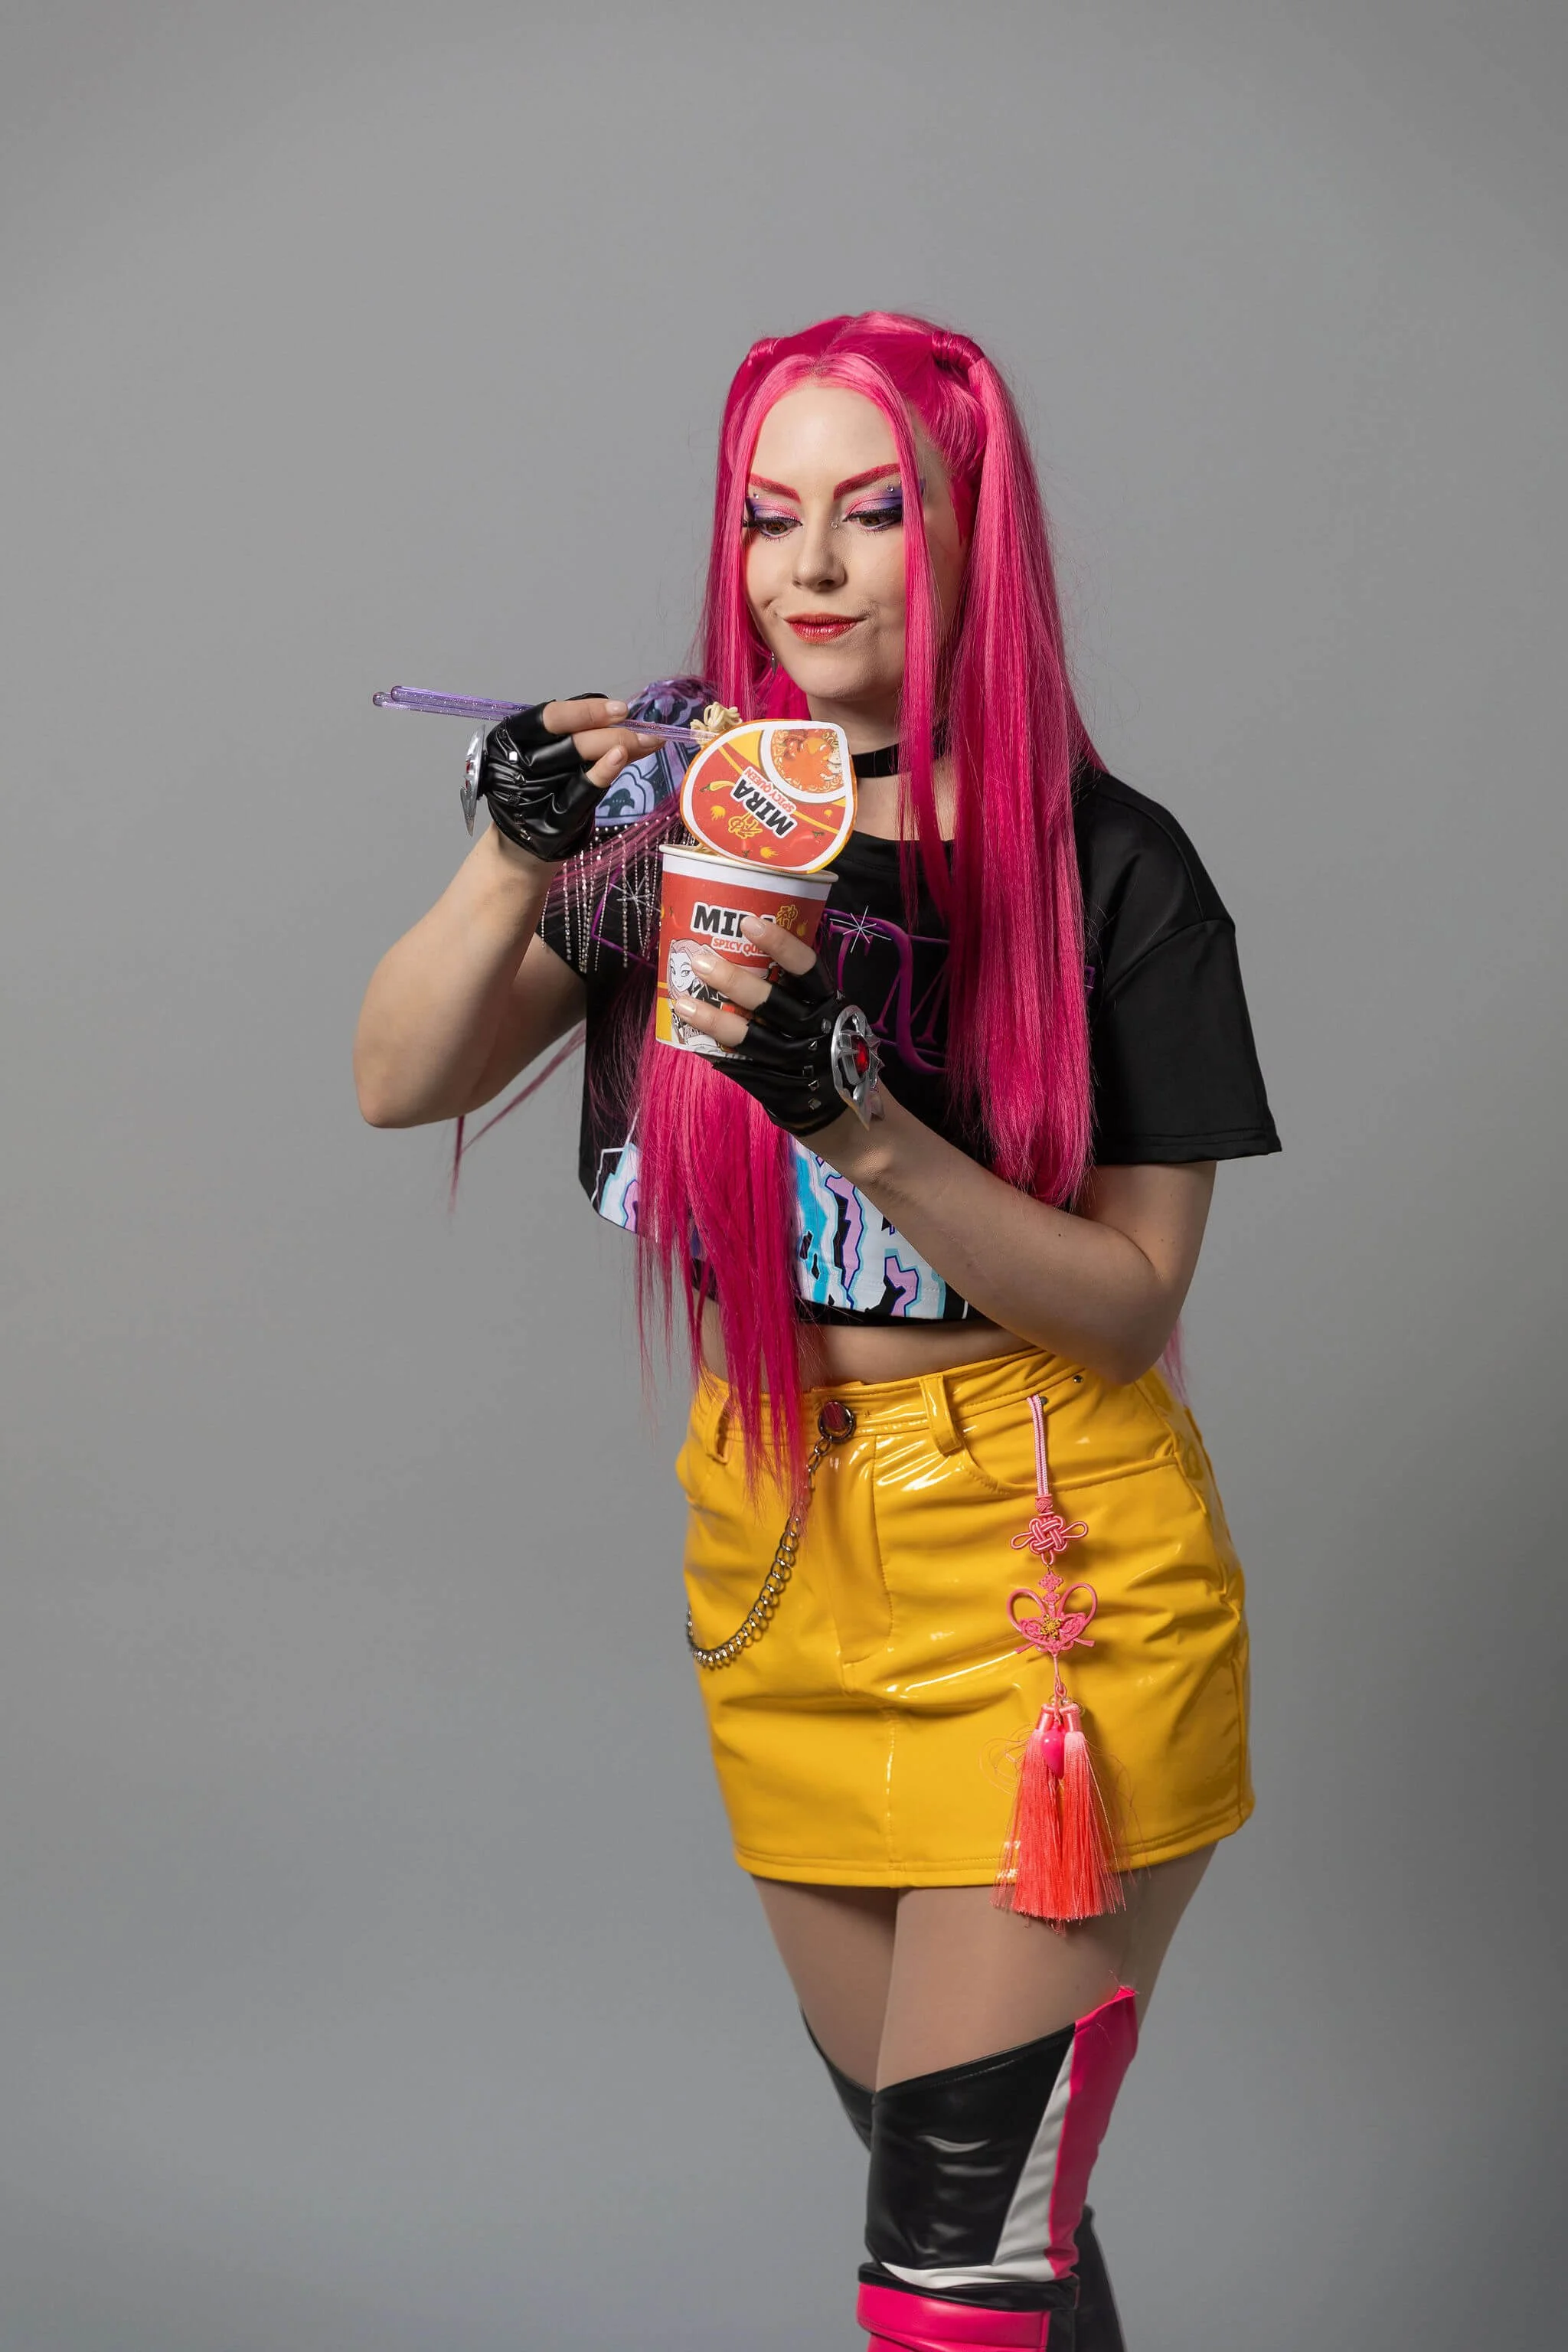
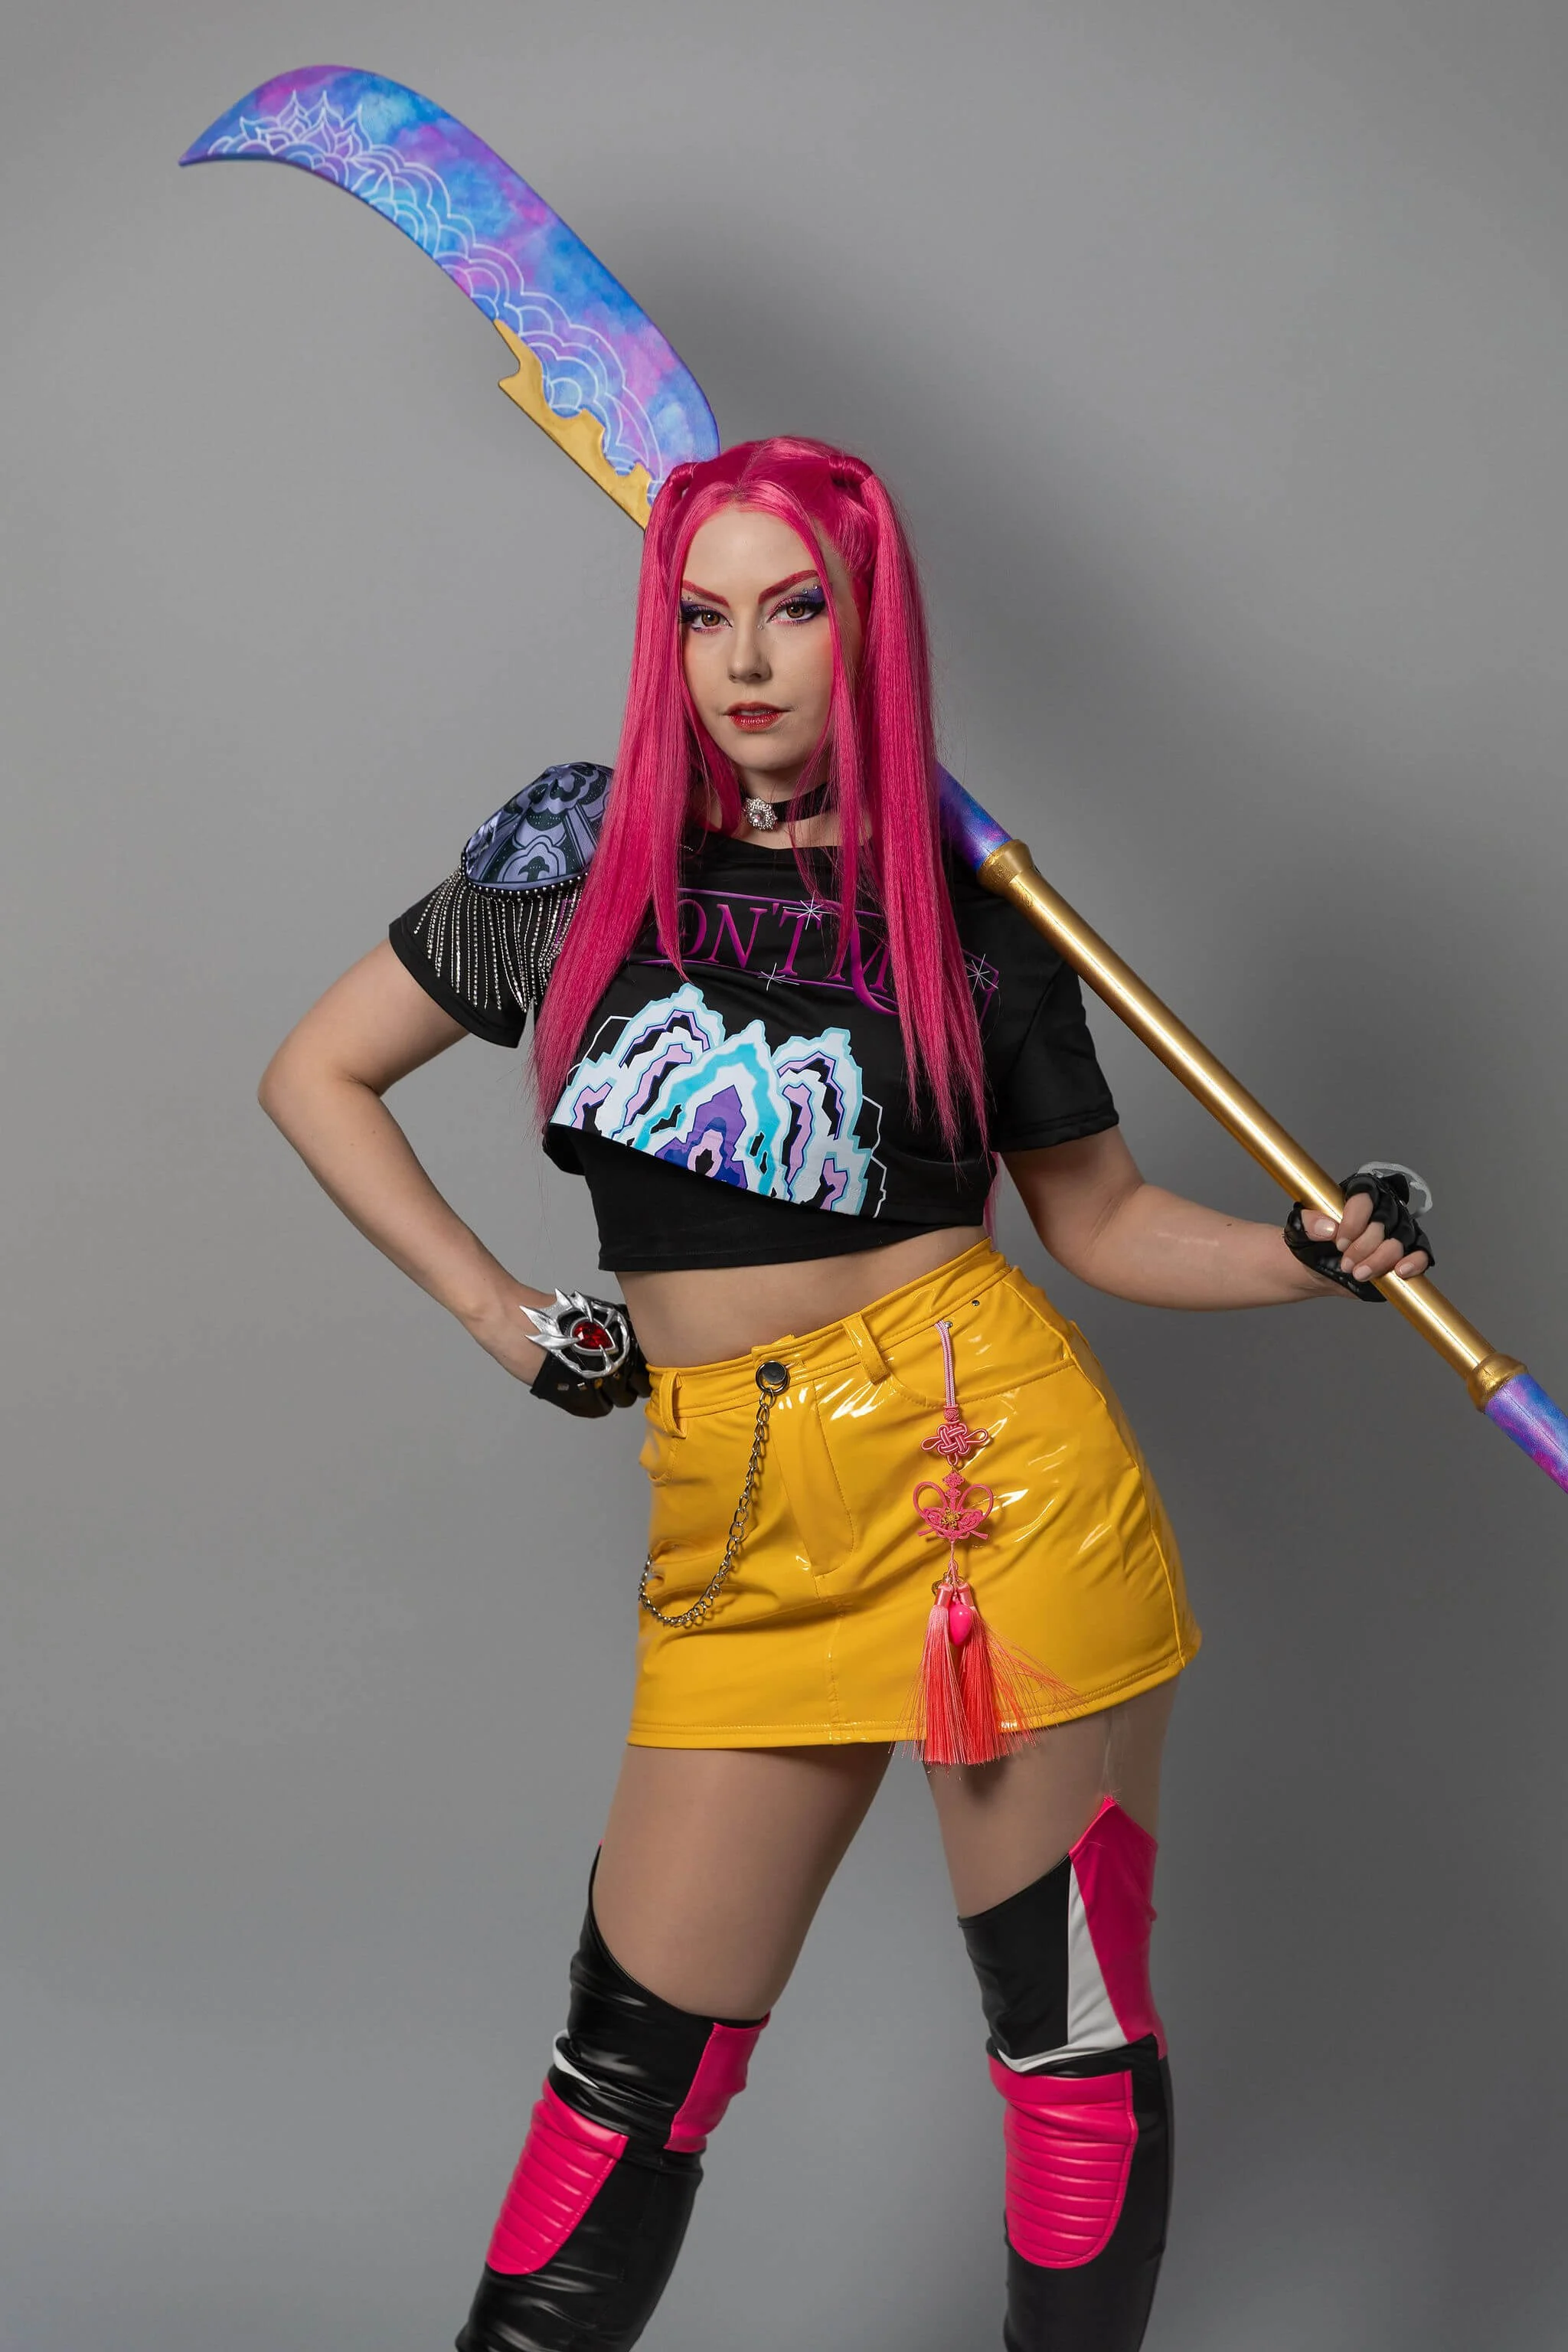
I shot my Mira cosplay (with a bajillion props… I asked ahead of time if I could bring ramen and bubble tea lol), and from the moment I arrived, everything felt pretty smooth.
I showed up about 15-20 minutes early, and the front desk attendant had just come back from her coffee break. She got me set up within a few minutes and walked me through everything before my time officially started, which I really appreciated. I think showing up early is ideal if you don’t want it to cut into your shoot time.
She showed me:
How to use the clicker
Where to look for the best camera eye line
How the automatic light box works
How long to wait between shots
How to preview photos instantly
She also let me know I could:
Change the background colour (with her help)
Switch between portrait, full body, or floor shots (again, with her help)
Use the props and stools in the studio
Play music on the tablet or pull up pose inspo on Pinterest
Set my phone up on the tripod to capture behind the scene footage
There was also plenty of space for my mini suitcase of props and touch-up supplies, plus a small table, chair, and hooks to keep everything organized.
They even had a tripod and ring light set up for behind-the-scenes content, which is such a nice bonus if you’re creating for social media.
Once everything was set, she started the timer, closed the door, and left me to it. There’s a countdown on the screen so you always know how much time you have left, which helped me pace myself and get into flow.
The Setup (And What You Get)
For a solo shoot, the space felt comfortable and functional.
If you’re going with a group and everyone has a lot of stuff, it might feel a bit tight (but doable), but for one person (or a small group), it works well.
The biggest standouts for me were:
The mirror
The instant preview screen
The overall simplicity and functionality of the setup (they really thought of everything!)
It’s designed to be easy to use, but still gives you that clean, studio-quality look.
What I Loved
1. Total Privacy = Total Confidence
This was easily my favourite part.
Because I was alone, I felt waaaaaay more comfortable trying:
Silly expressions
Exaggerated or bold poses
Things I normally might feel shy trying in front of a photographer (no matter how comfortable they make me feel).
And honestly, that’s how I got some of my favourite shots.
My ramen prop photos turned out super expressive and goofy because I wasn’t overthinking it or worried about looking bad… and I LOVE them!
Practicing like this alone first gives me more confidence for when work with photographers in the future now too.


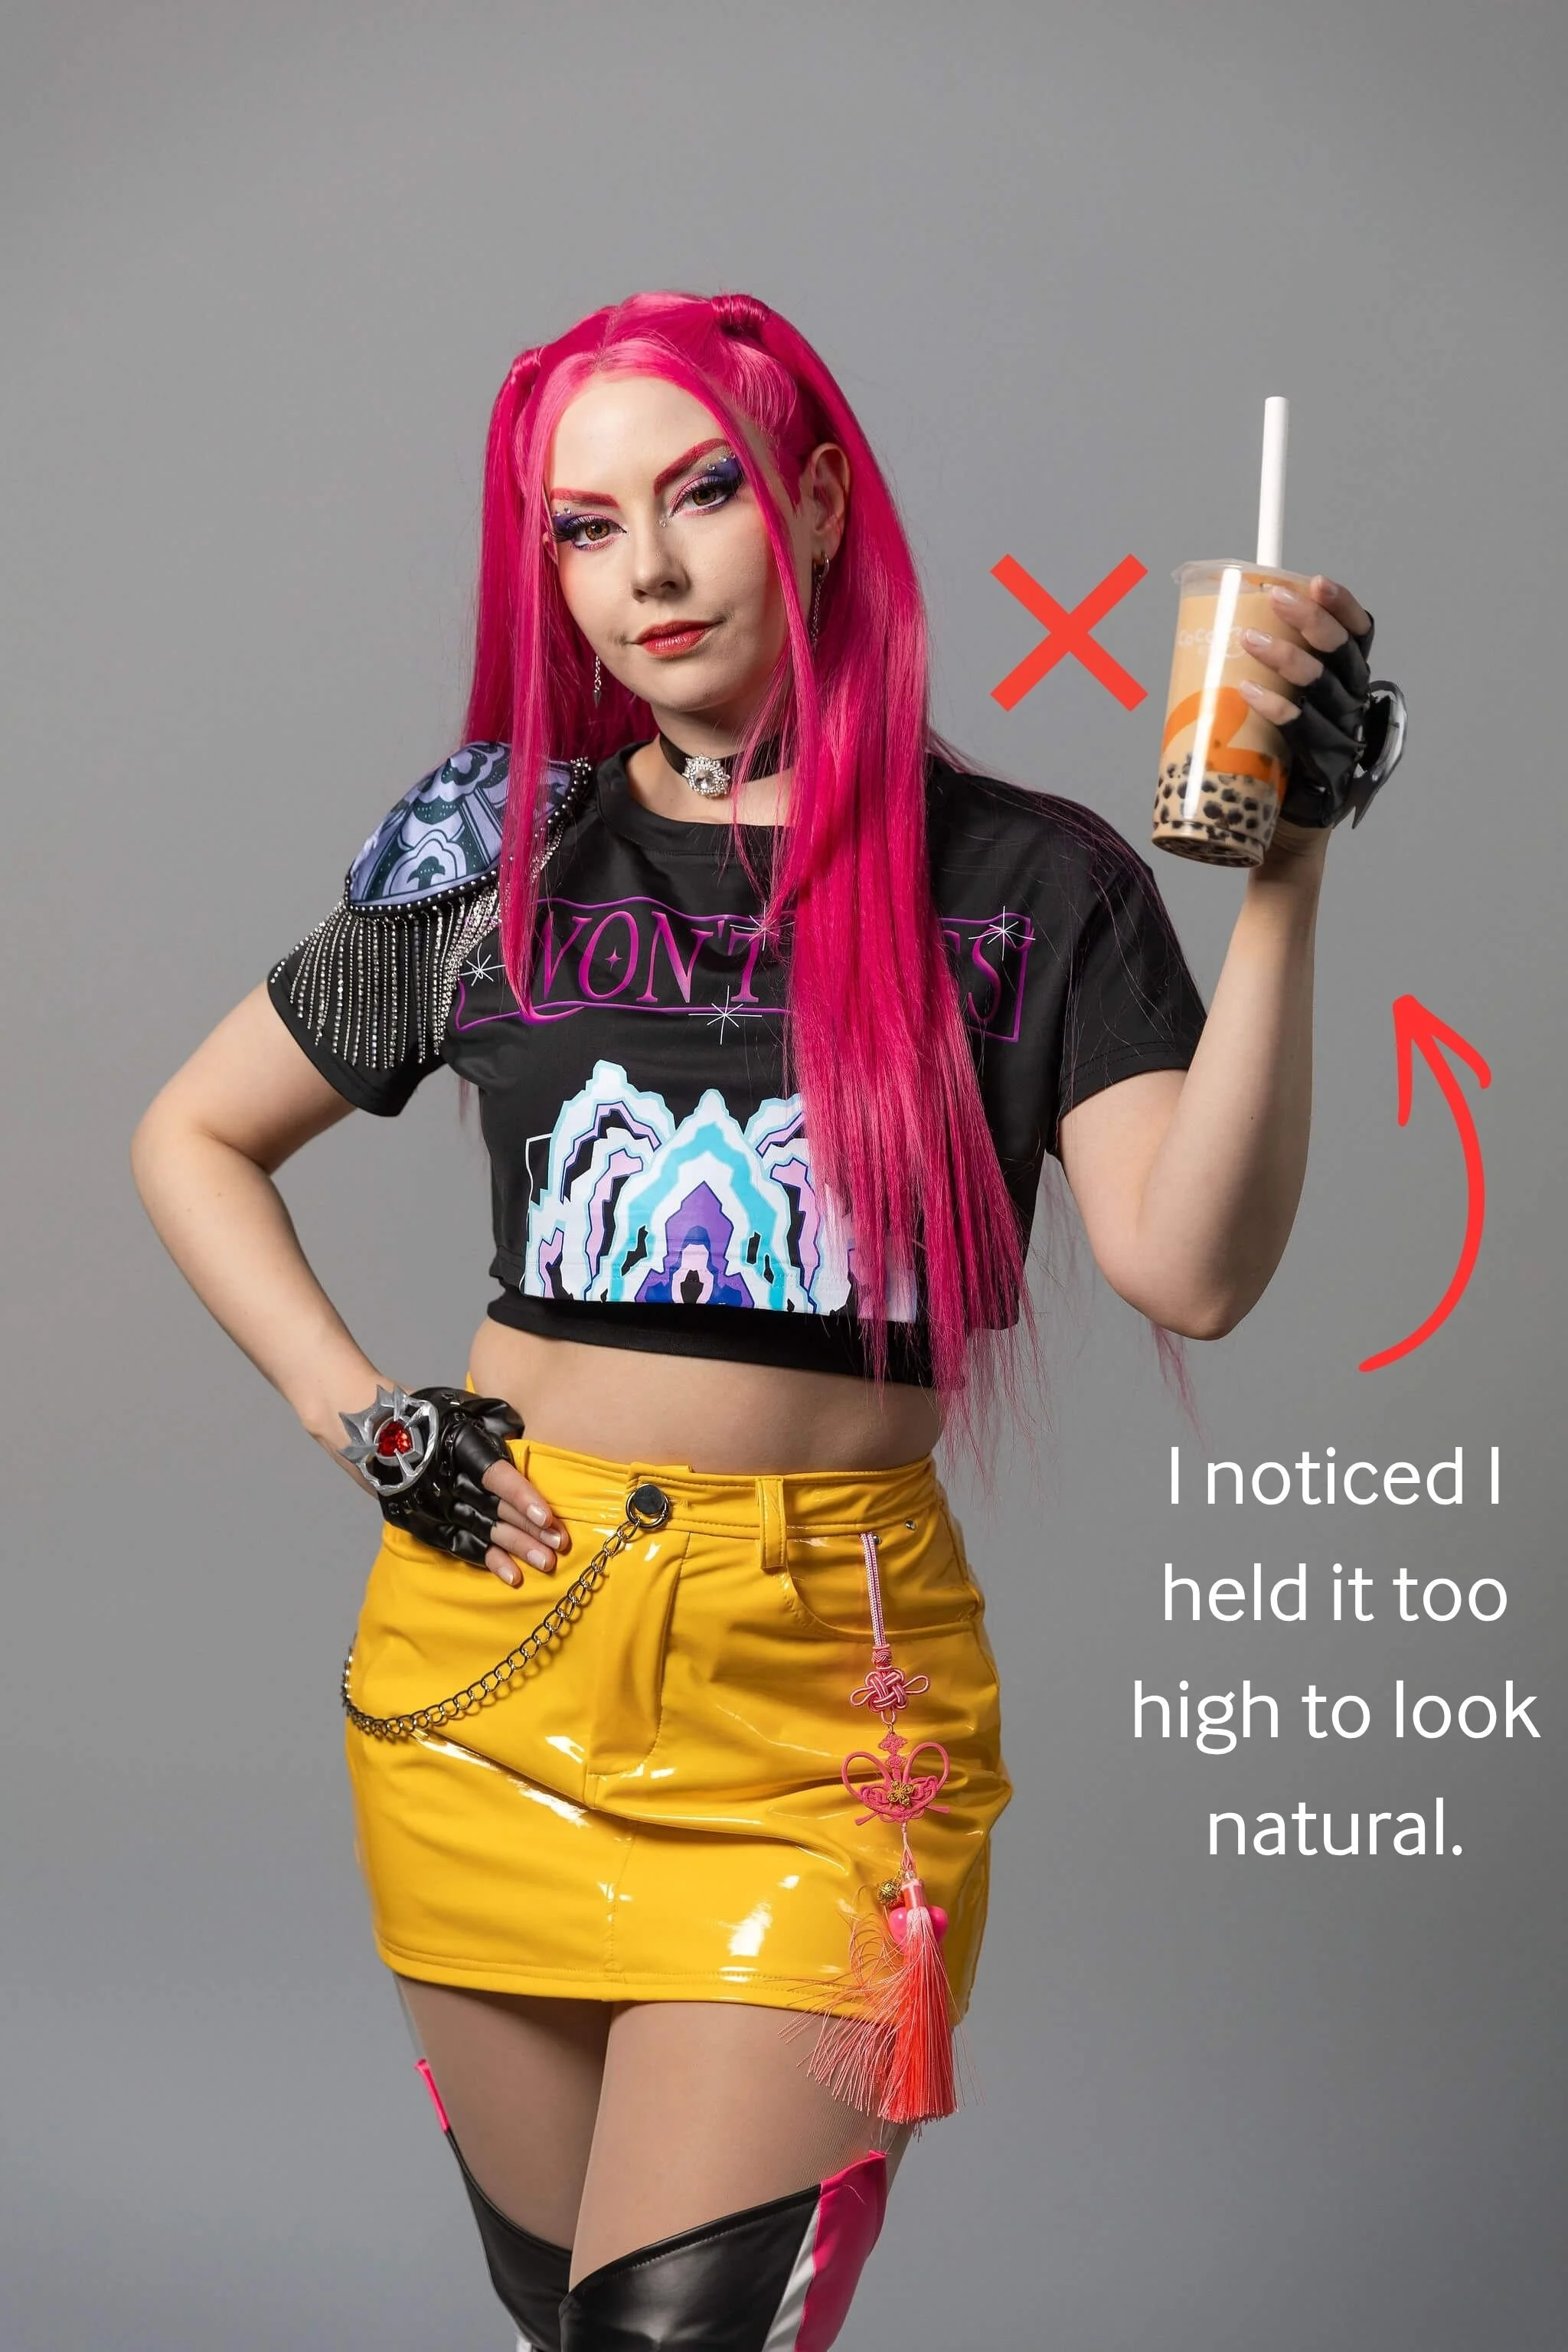
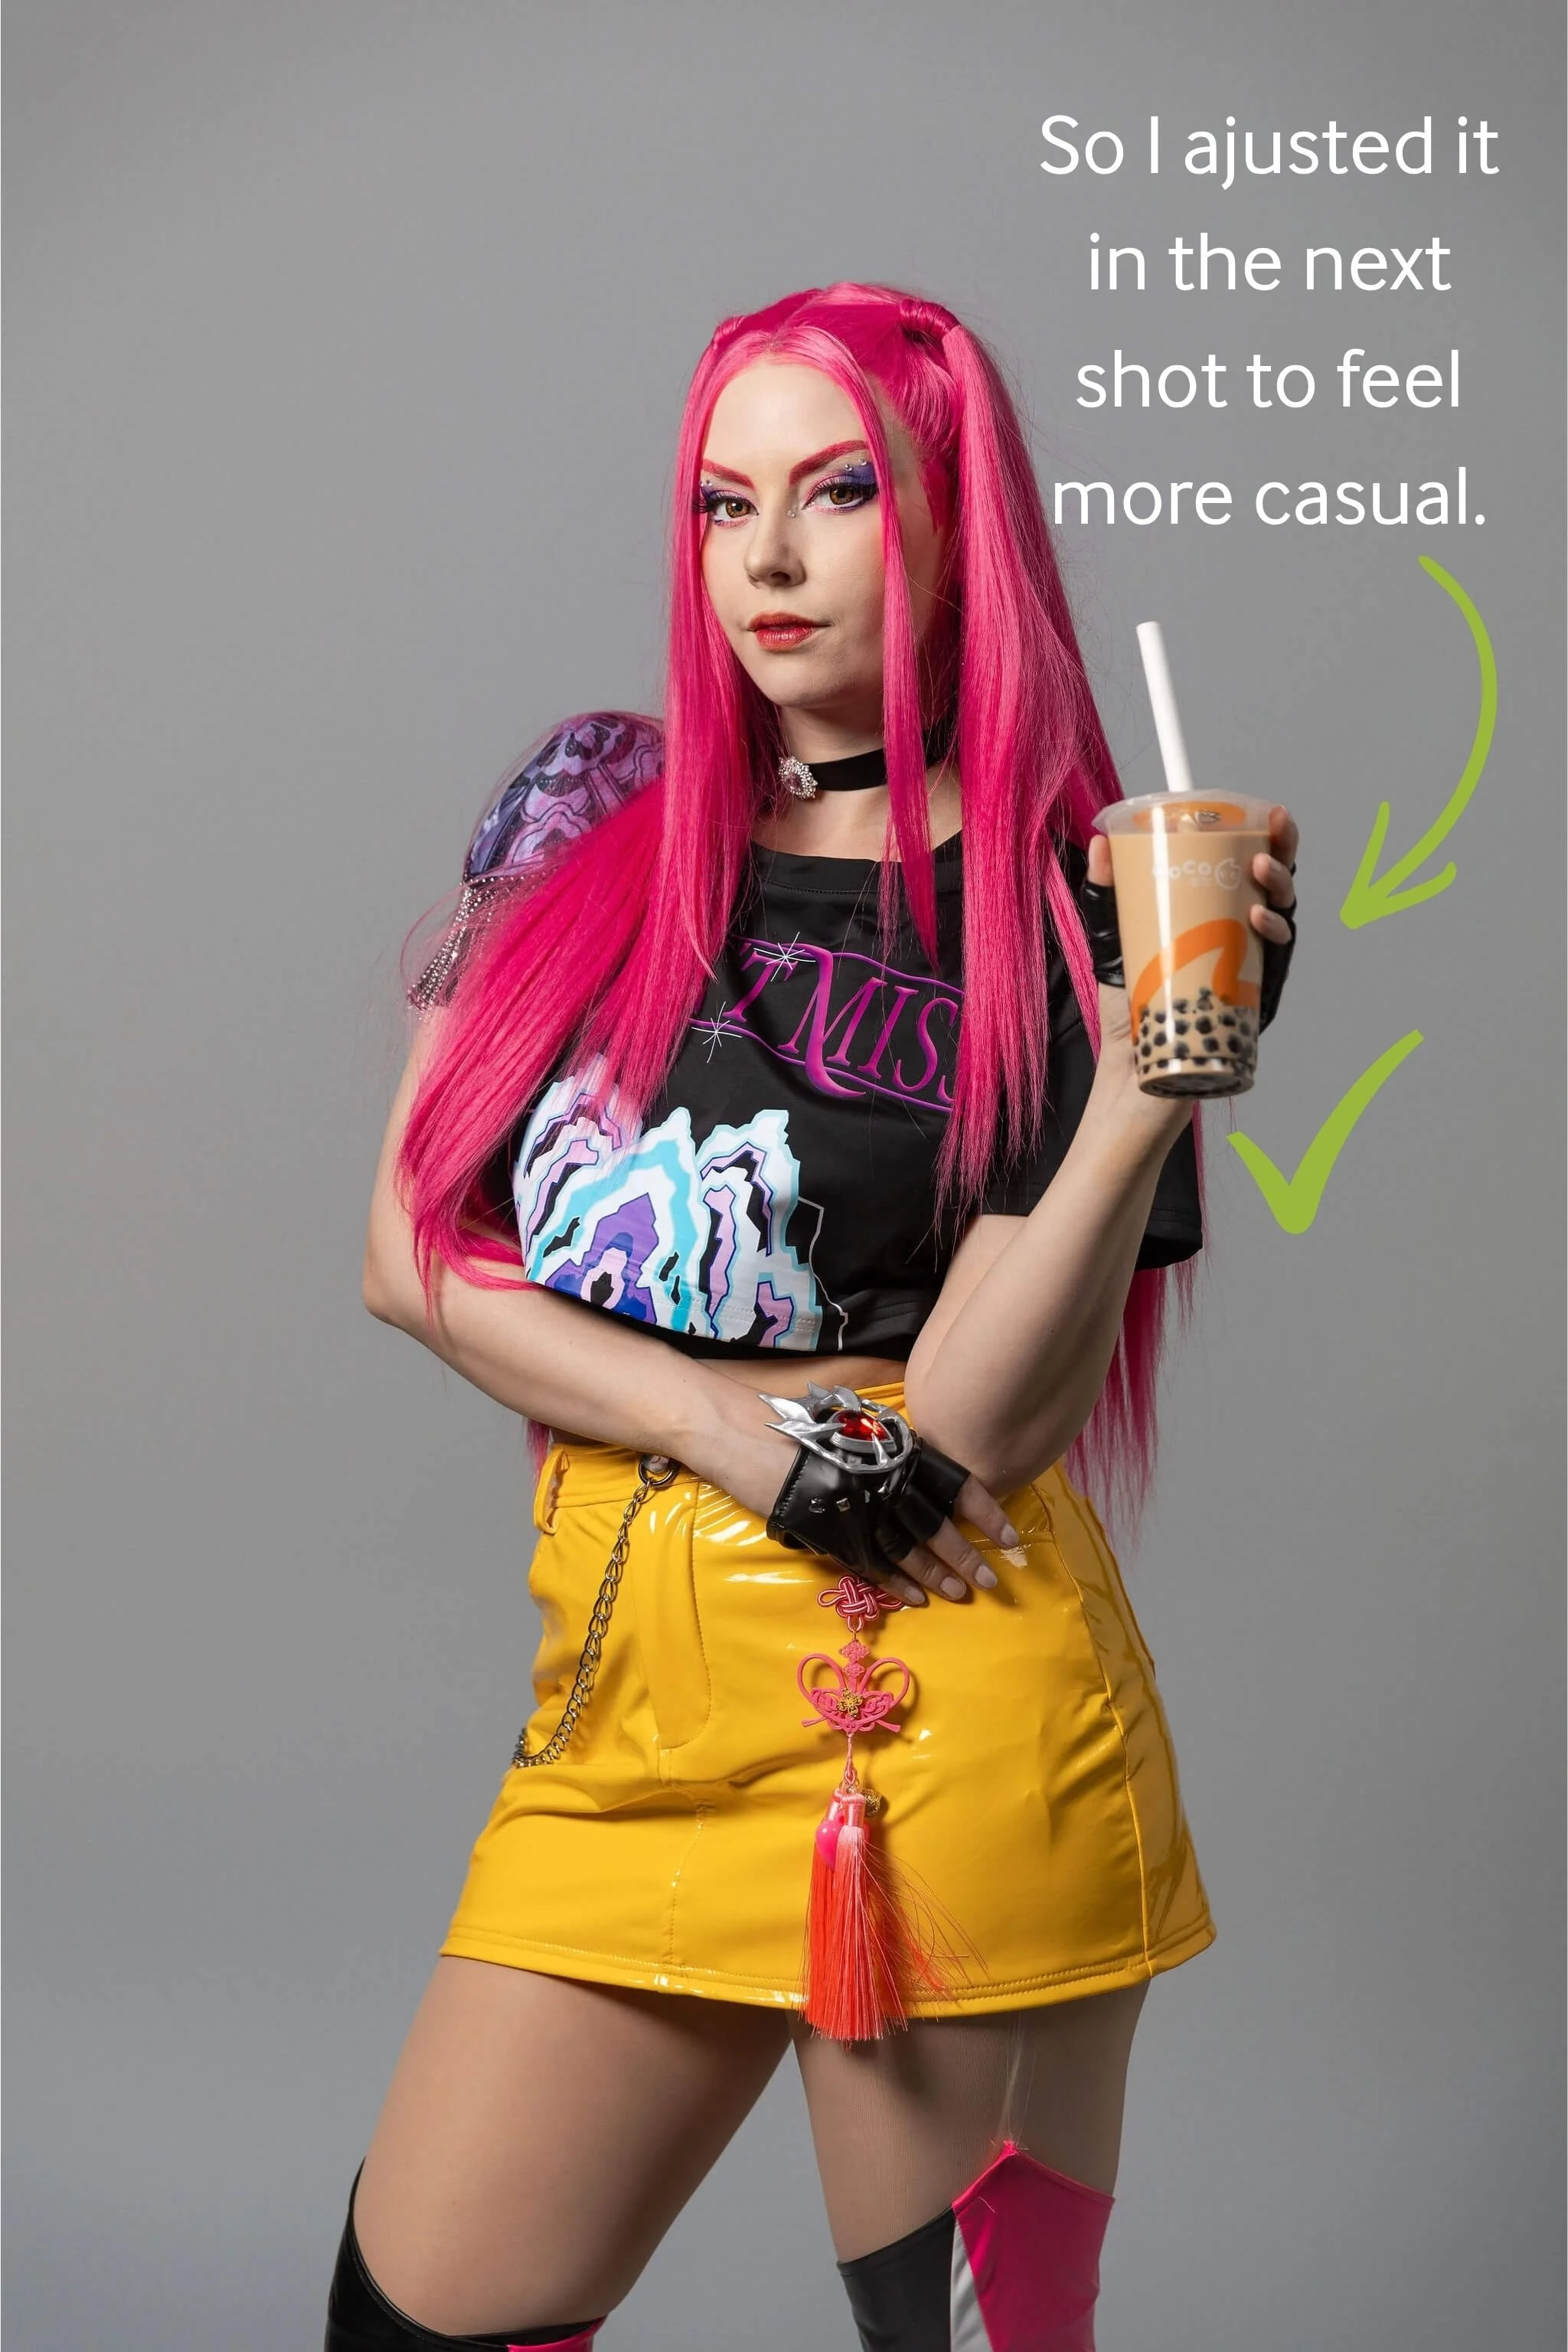
2. Instant Feedback (No Guesswork)
The combo of the mirror and preview screen is so helpful.
I could check my angles in the mirror, take the shot, and immediately see what worked (or didn’t). That feedback loop made it really easy to adjust and improve as I went.
For example check out the two images below.
4. Fast Turnaround
I got all my 225 photos back within 24 hours, delivered straight to my email in both web and high-resolution versions.
No chasing files. No waiting weeks.
Also, I don’t think they need any editing! I might do a little touch up on some of them to erase the strap holding my boots up, or crop some images in tighter for more variety, but other than that, they are basically ready to post/print.
A Few Things to Keep in Mind
Nothing major, but a few small things I noticed…
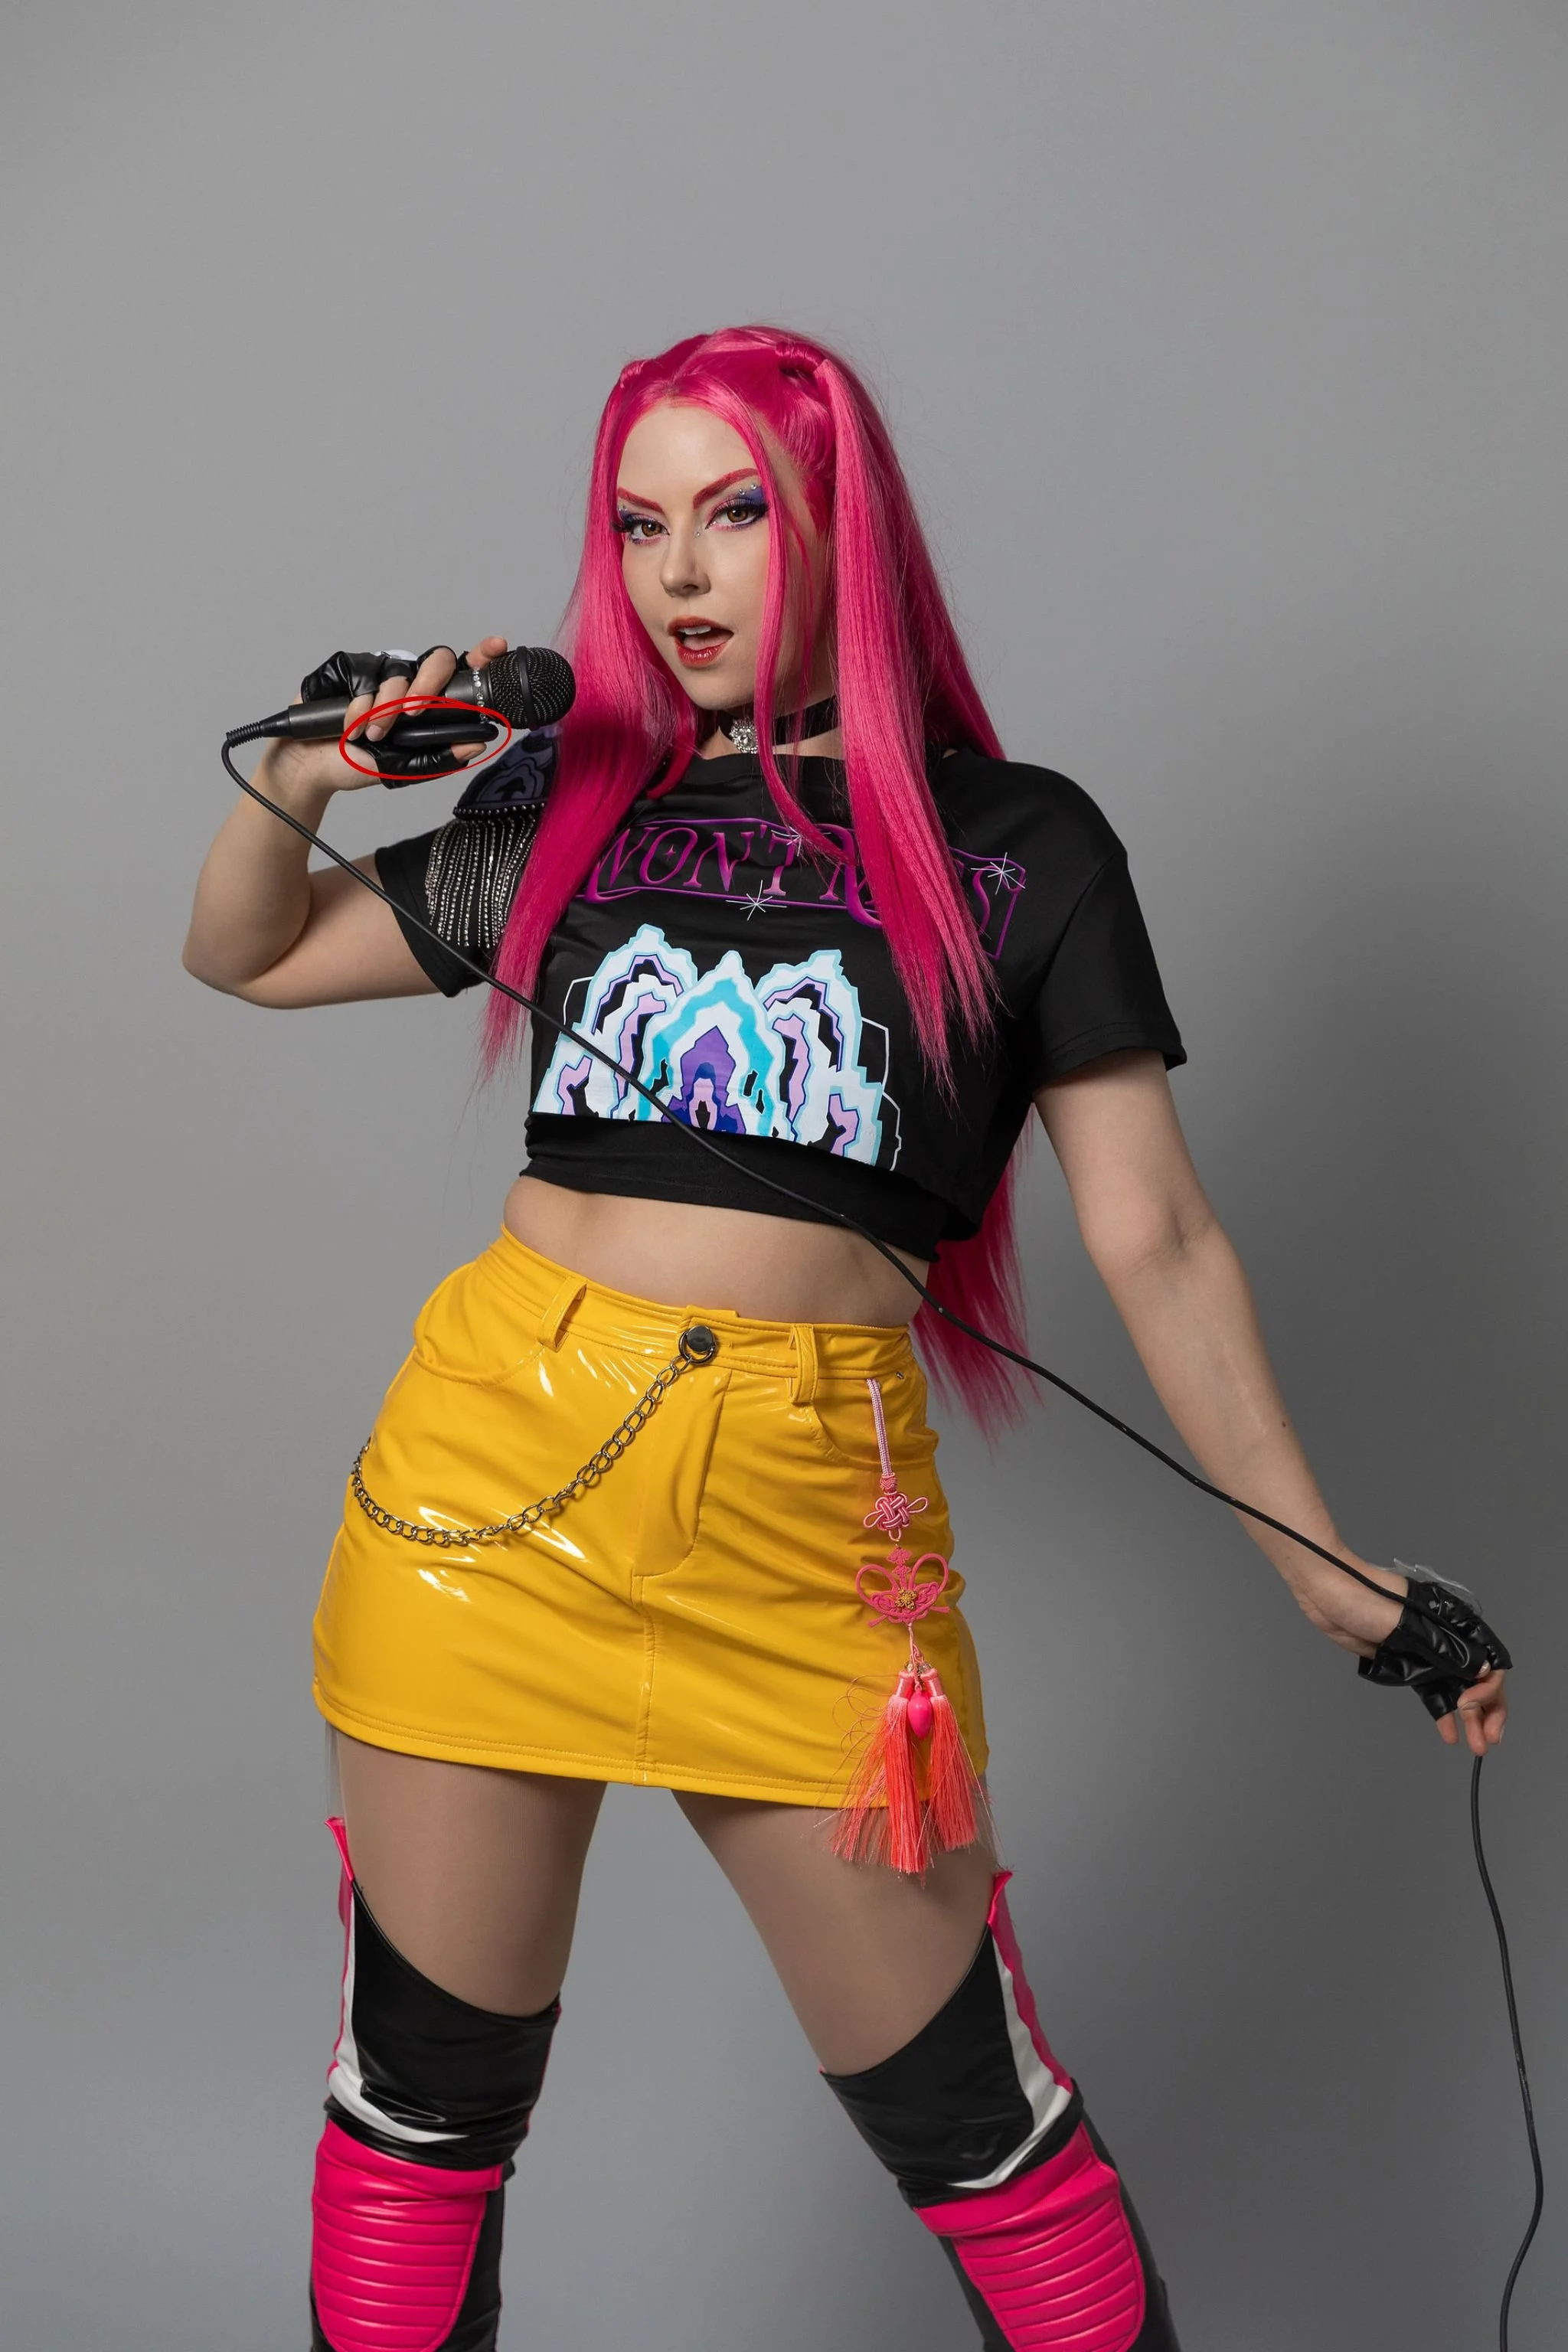
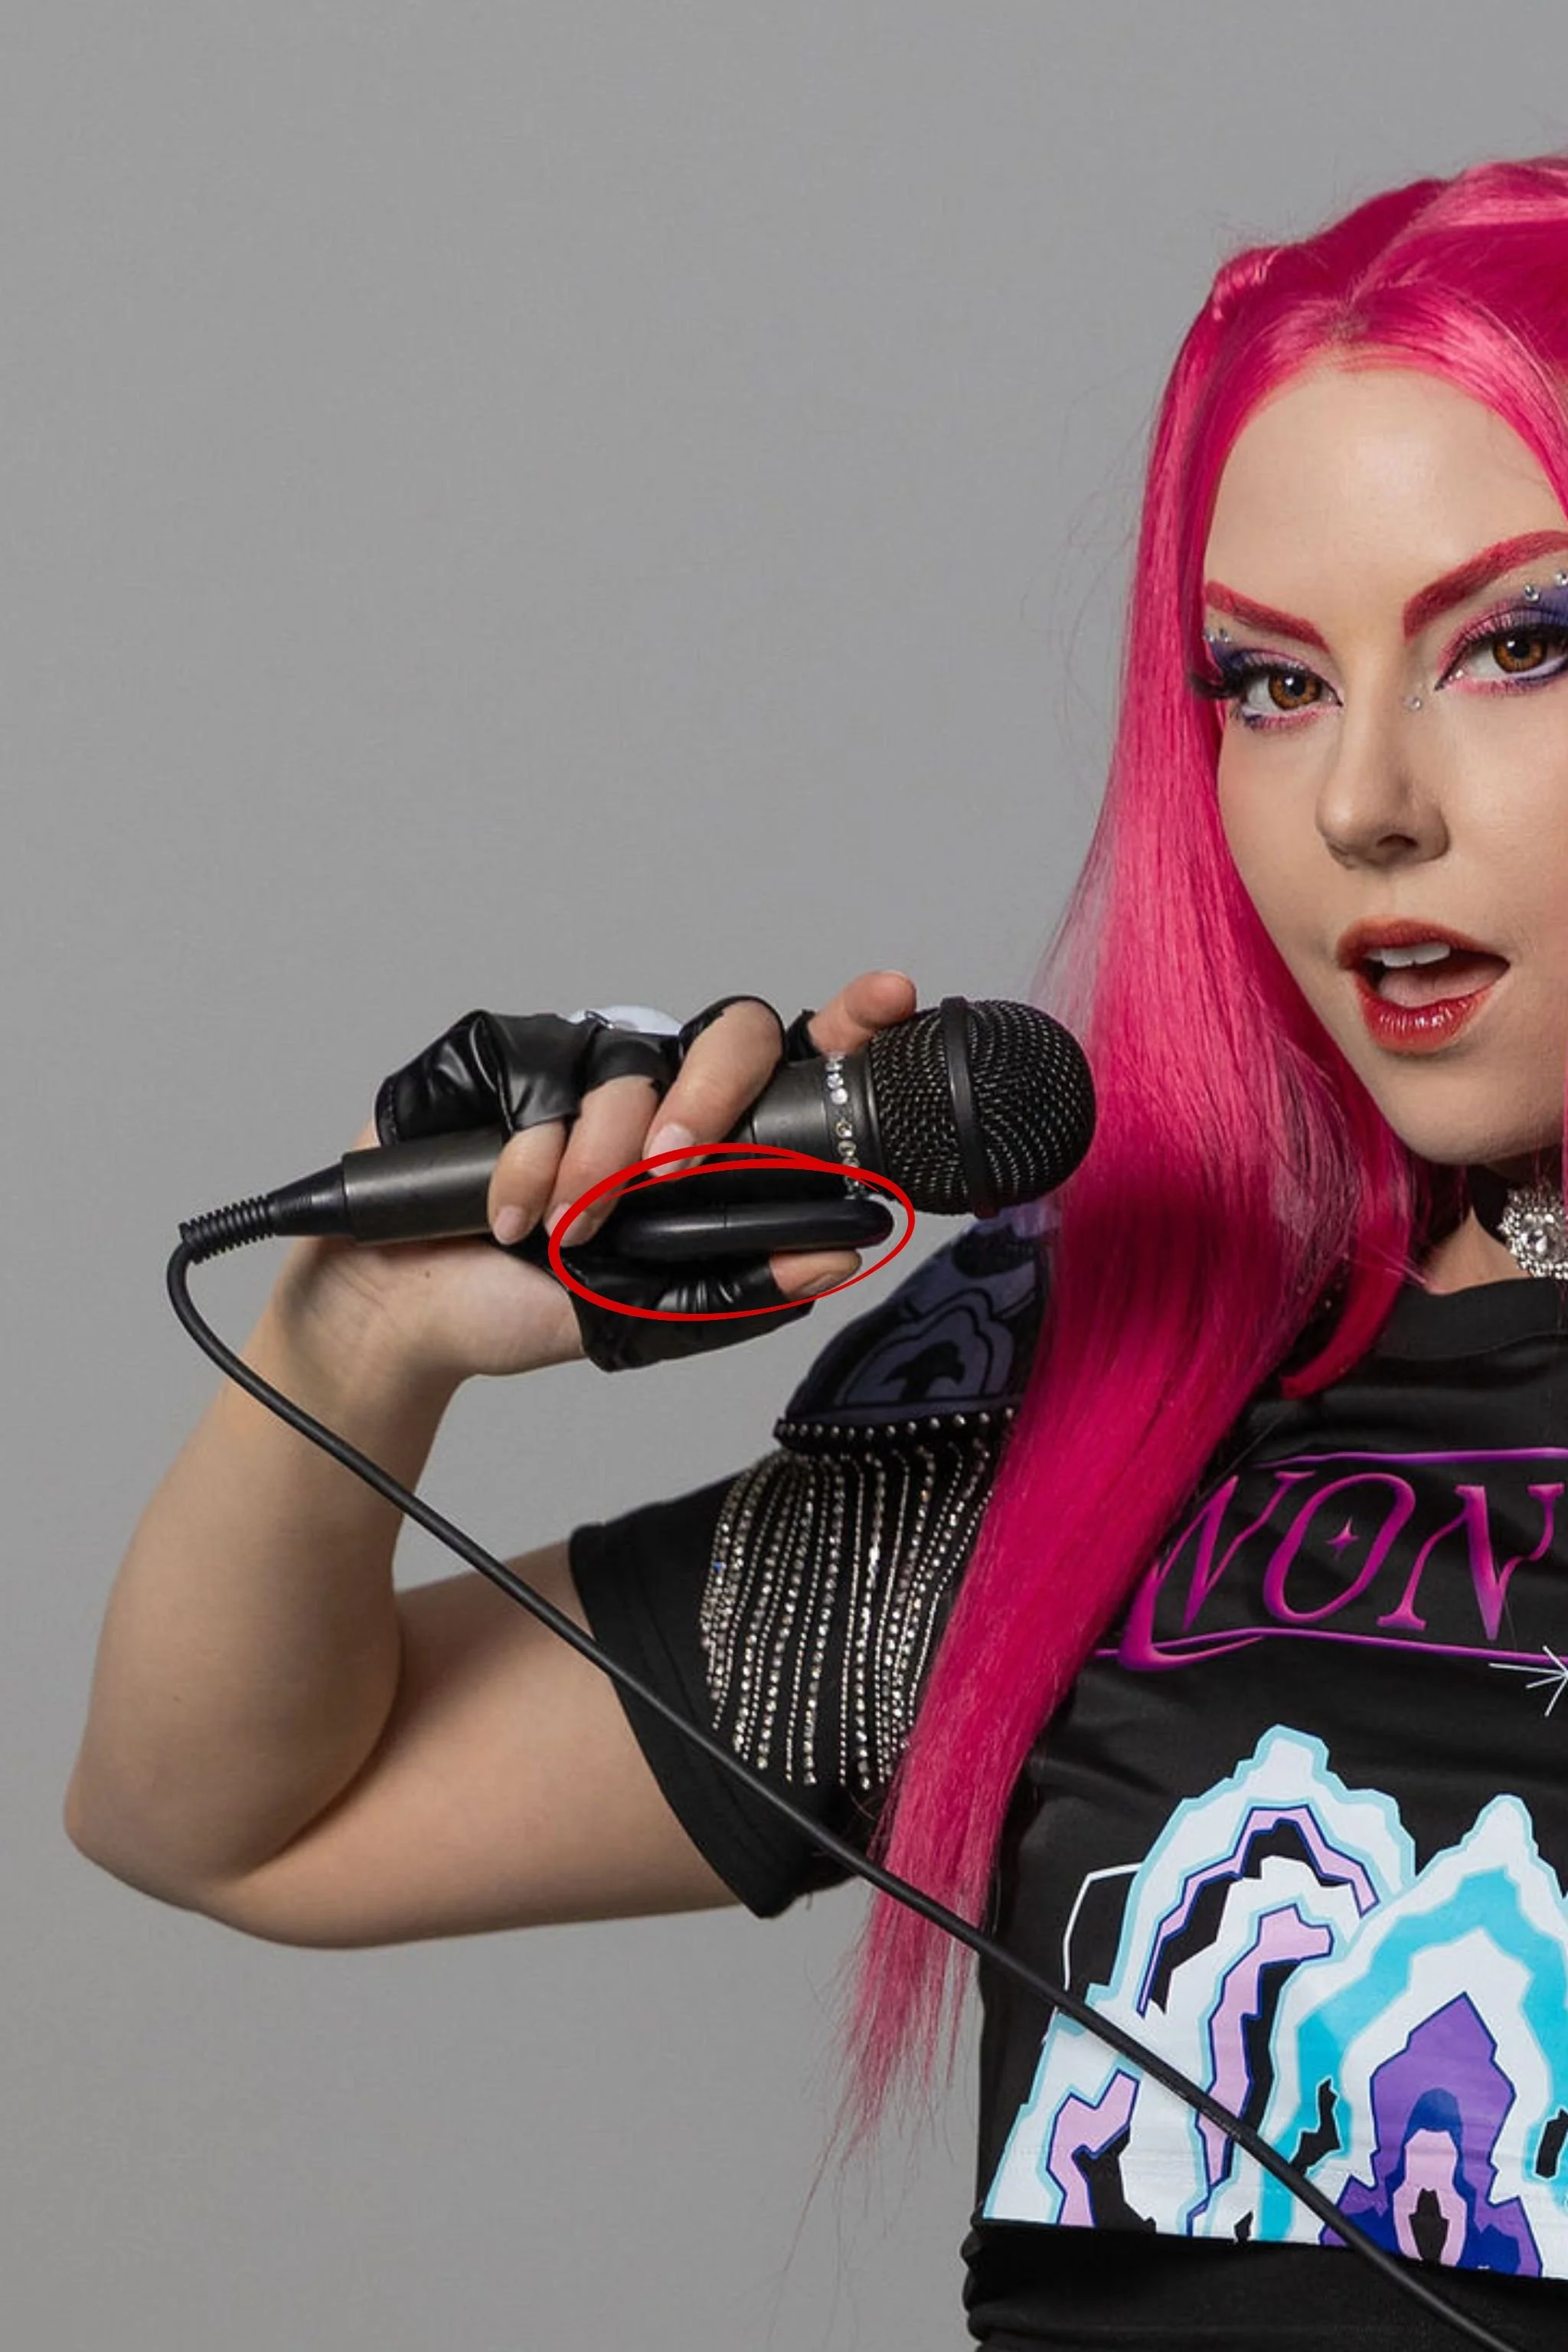
The Clicker Can Be Tricky
My clicker ran out of batteries partway through. Not a big deal, and they paused my time while replacing it, but something to be aware of and speak up about quickly if it happens to you.
It can also be a bit hard to hide depending on your pose. I tried tucking it behind props or my body, but you can still spot it in some shots (even though I was lucky that my black gloves camouflaged it a bit). If you’re planning a session, it’s worth thinking about how you’ll disguise it.
Limited Angles
One thing I wish I could have done was low-to-high angle shots for that more dramatic, elongating look.
From a technical standpoint, it makes sense why that’s not possible. The ceiling and backdrop height would end up in frame.
But you can still do lower poses (like sitting on the floor or crouching), and they can angle the camera down for you, just not upward.
Lighting Is Slighlty One Directional
The lighting setup is simple and very flattering, but it is a bit directional.
The main light is on one side (with what looks to be a reflective wall on the other), which creates really nice, soft lighting overall. But it does mean your angles are somewhat limited depending on how you like to pose.
For example, if you want to shoot looking straight to the camera, your right side of your face will naturally be more in the light than the other. And if you turn your face to a more ¾ angle to have your full face lit, then you can only face the right (with the left side of your face toward the camera).
In my case, this actually worked out better for me because I prefer my left side to face the camera, but if you favour the right side of your face, you might find yourself turning slightly away from the light.
Not a dealbreaker at all, just something to be aware of when you’re planning your poses.


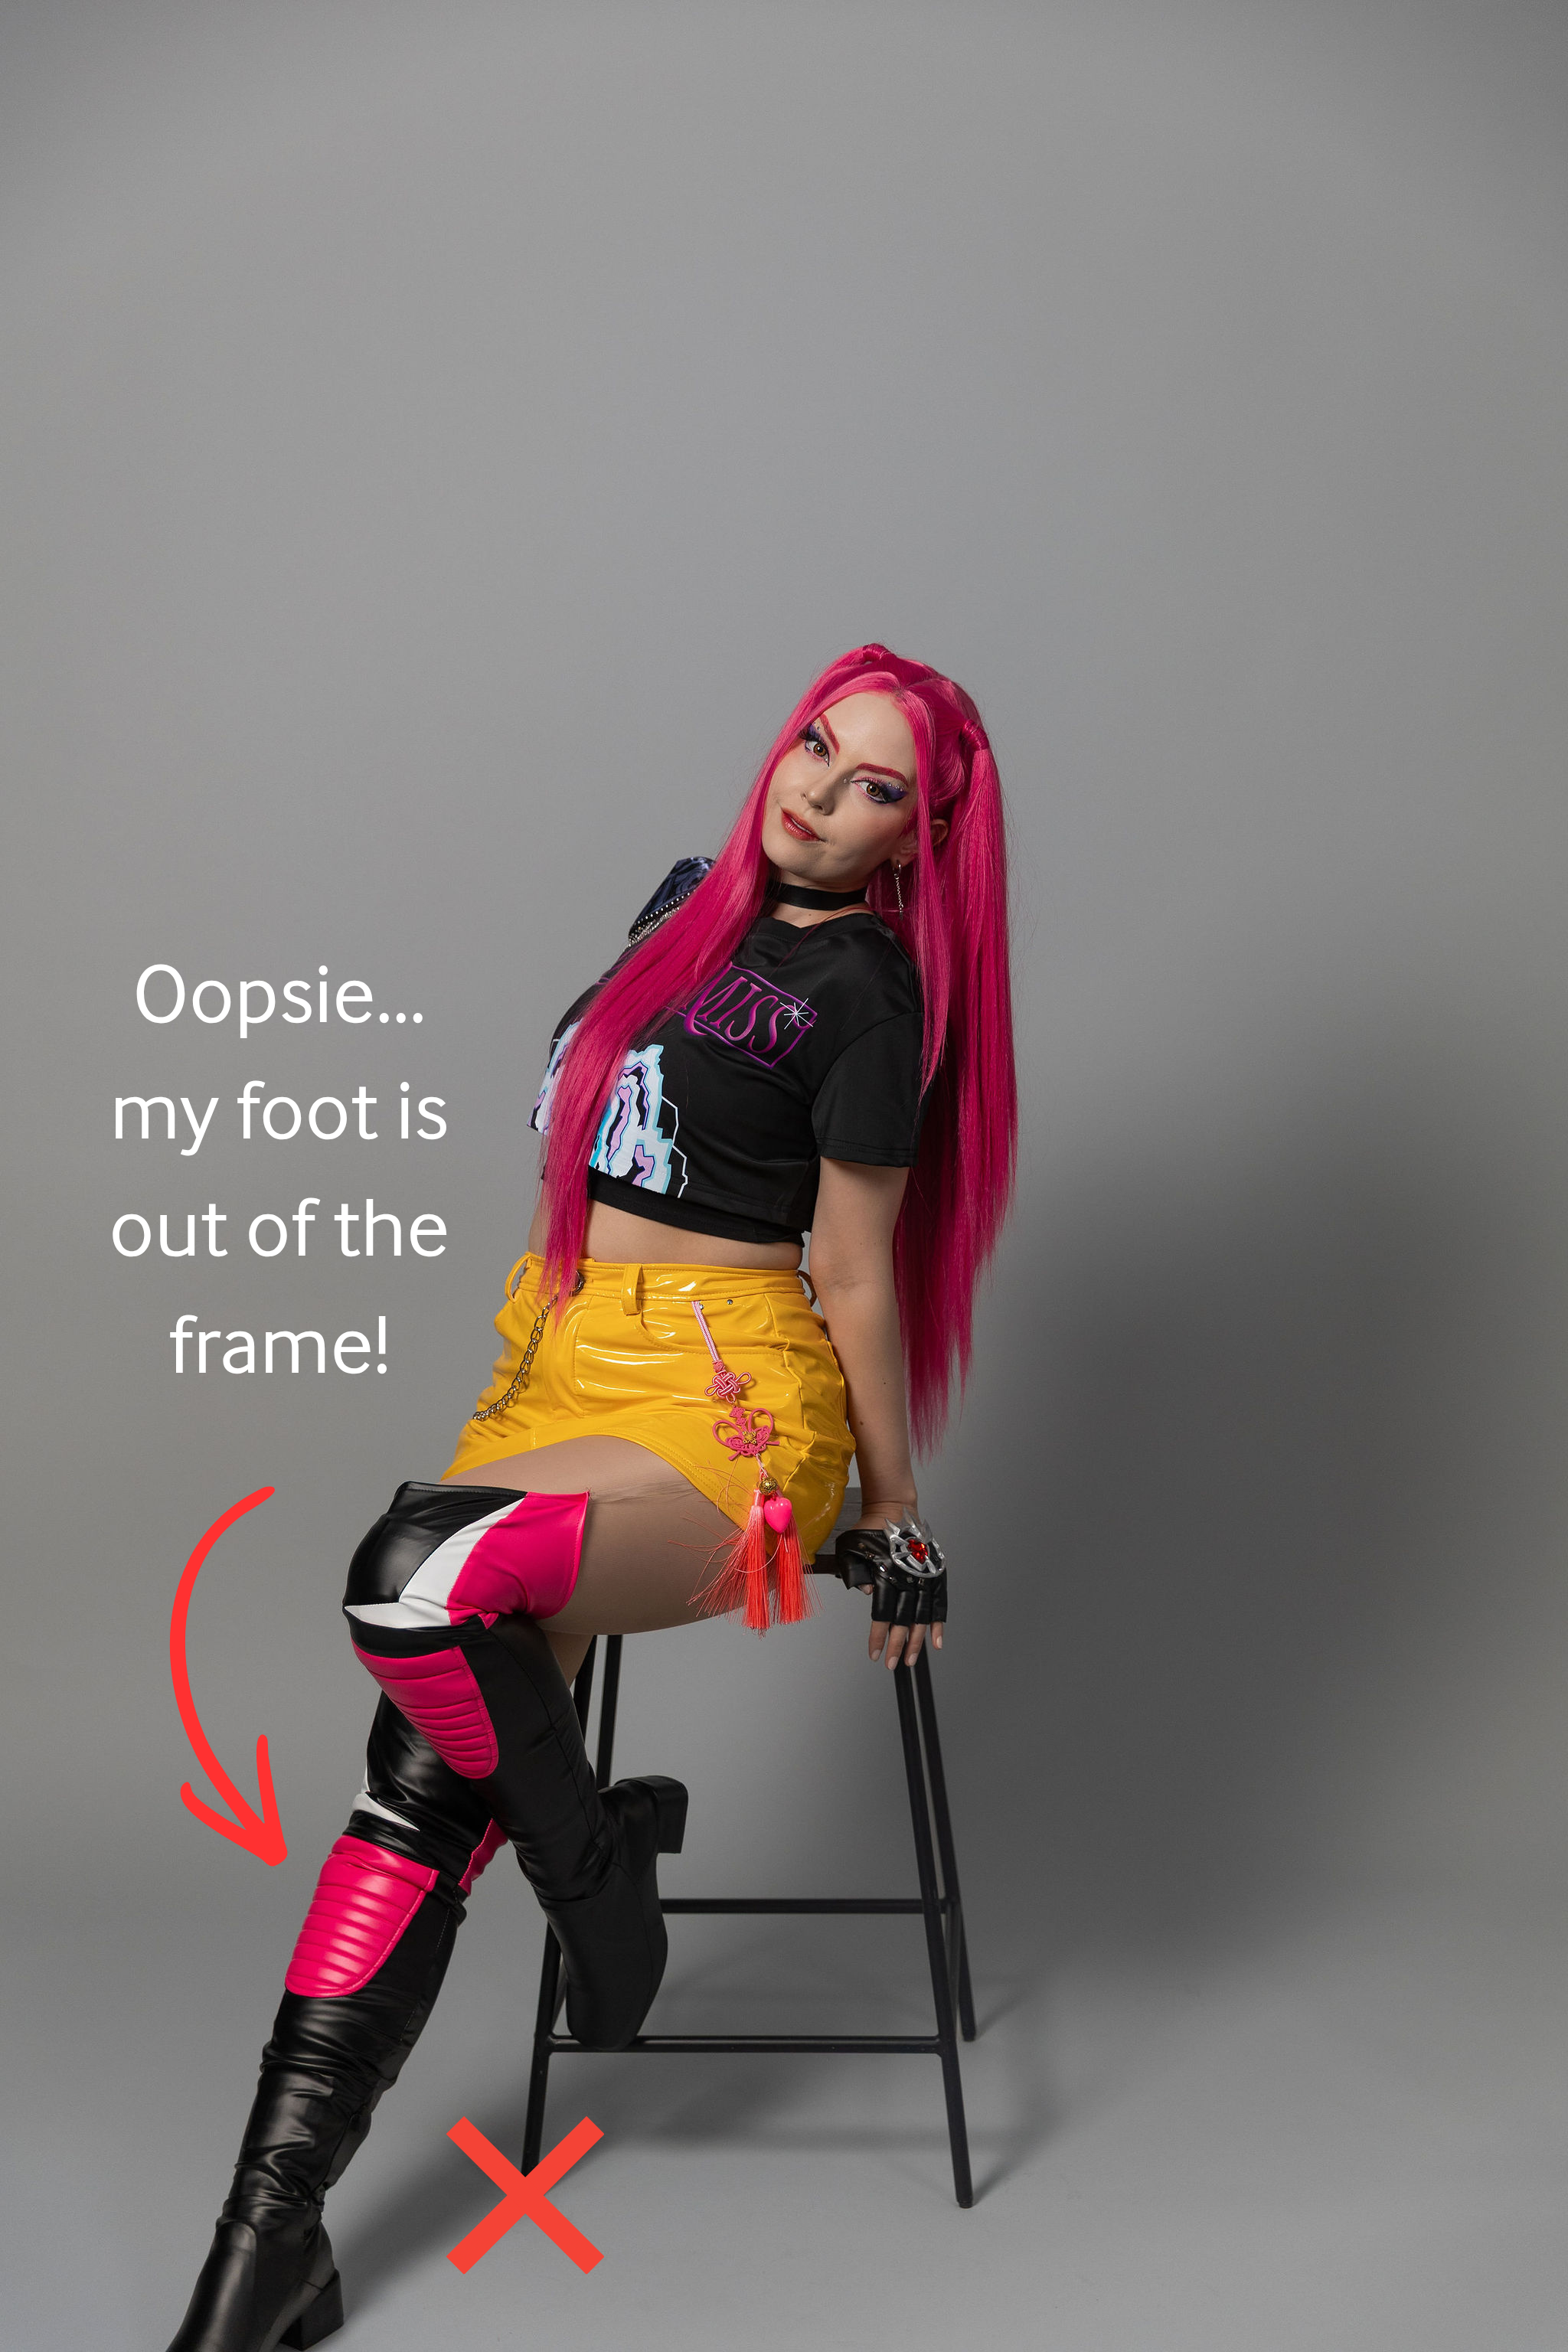
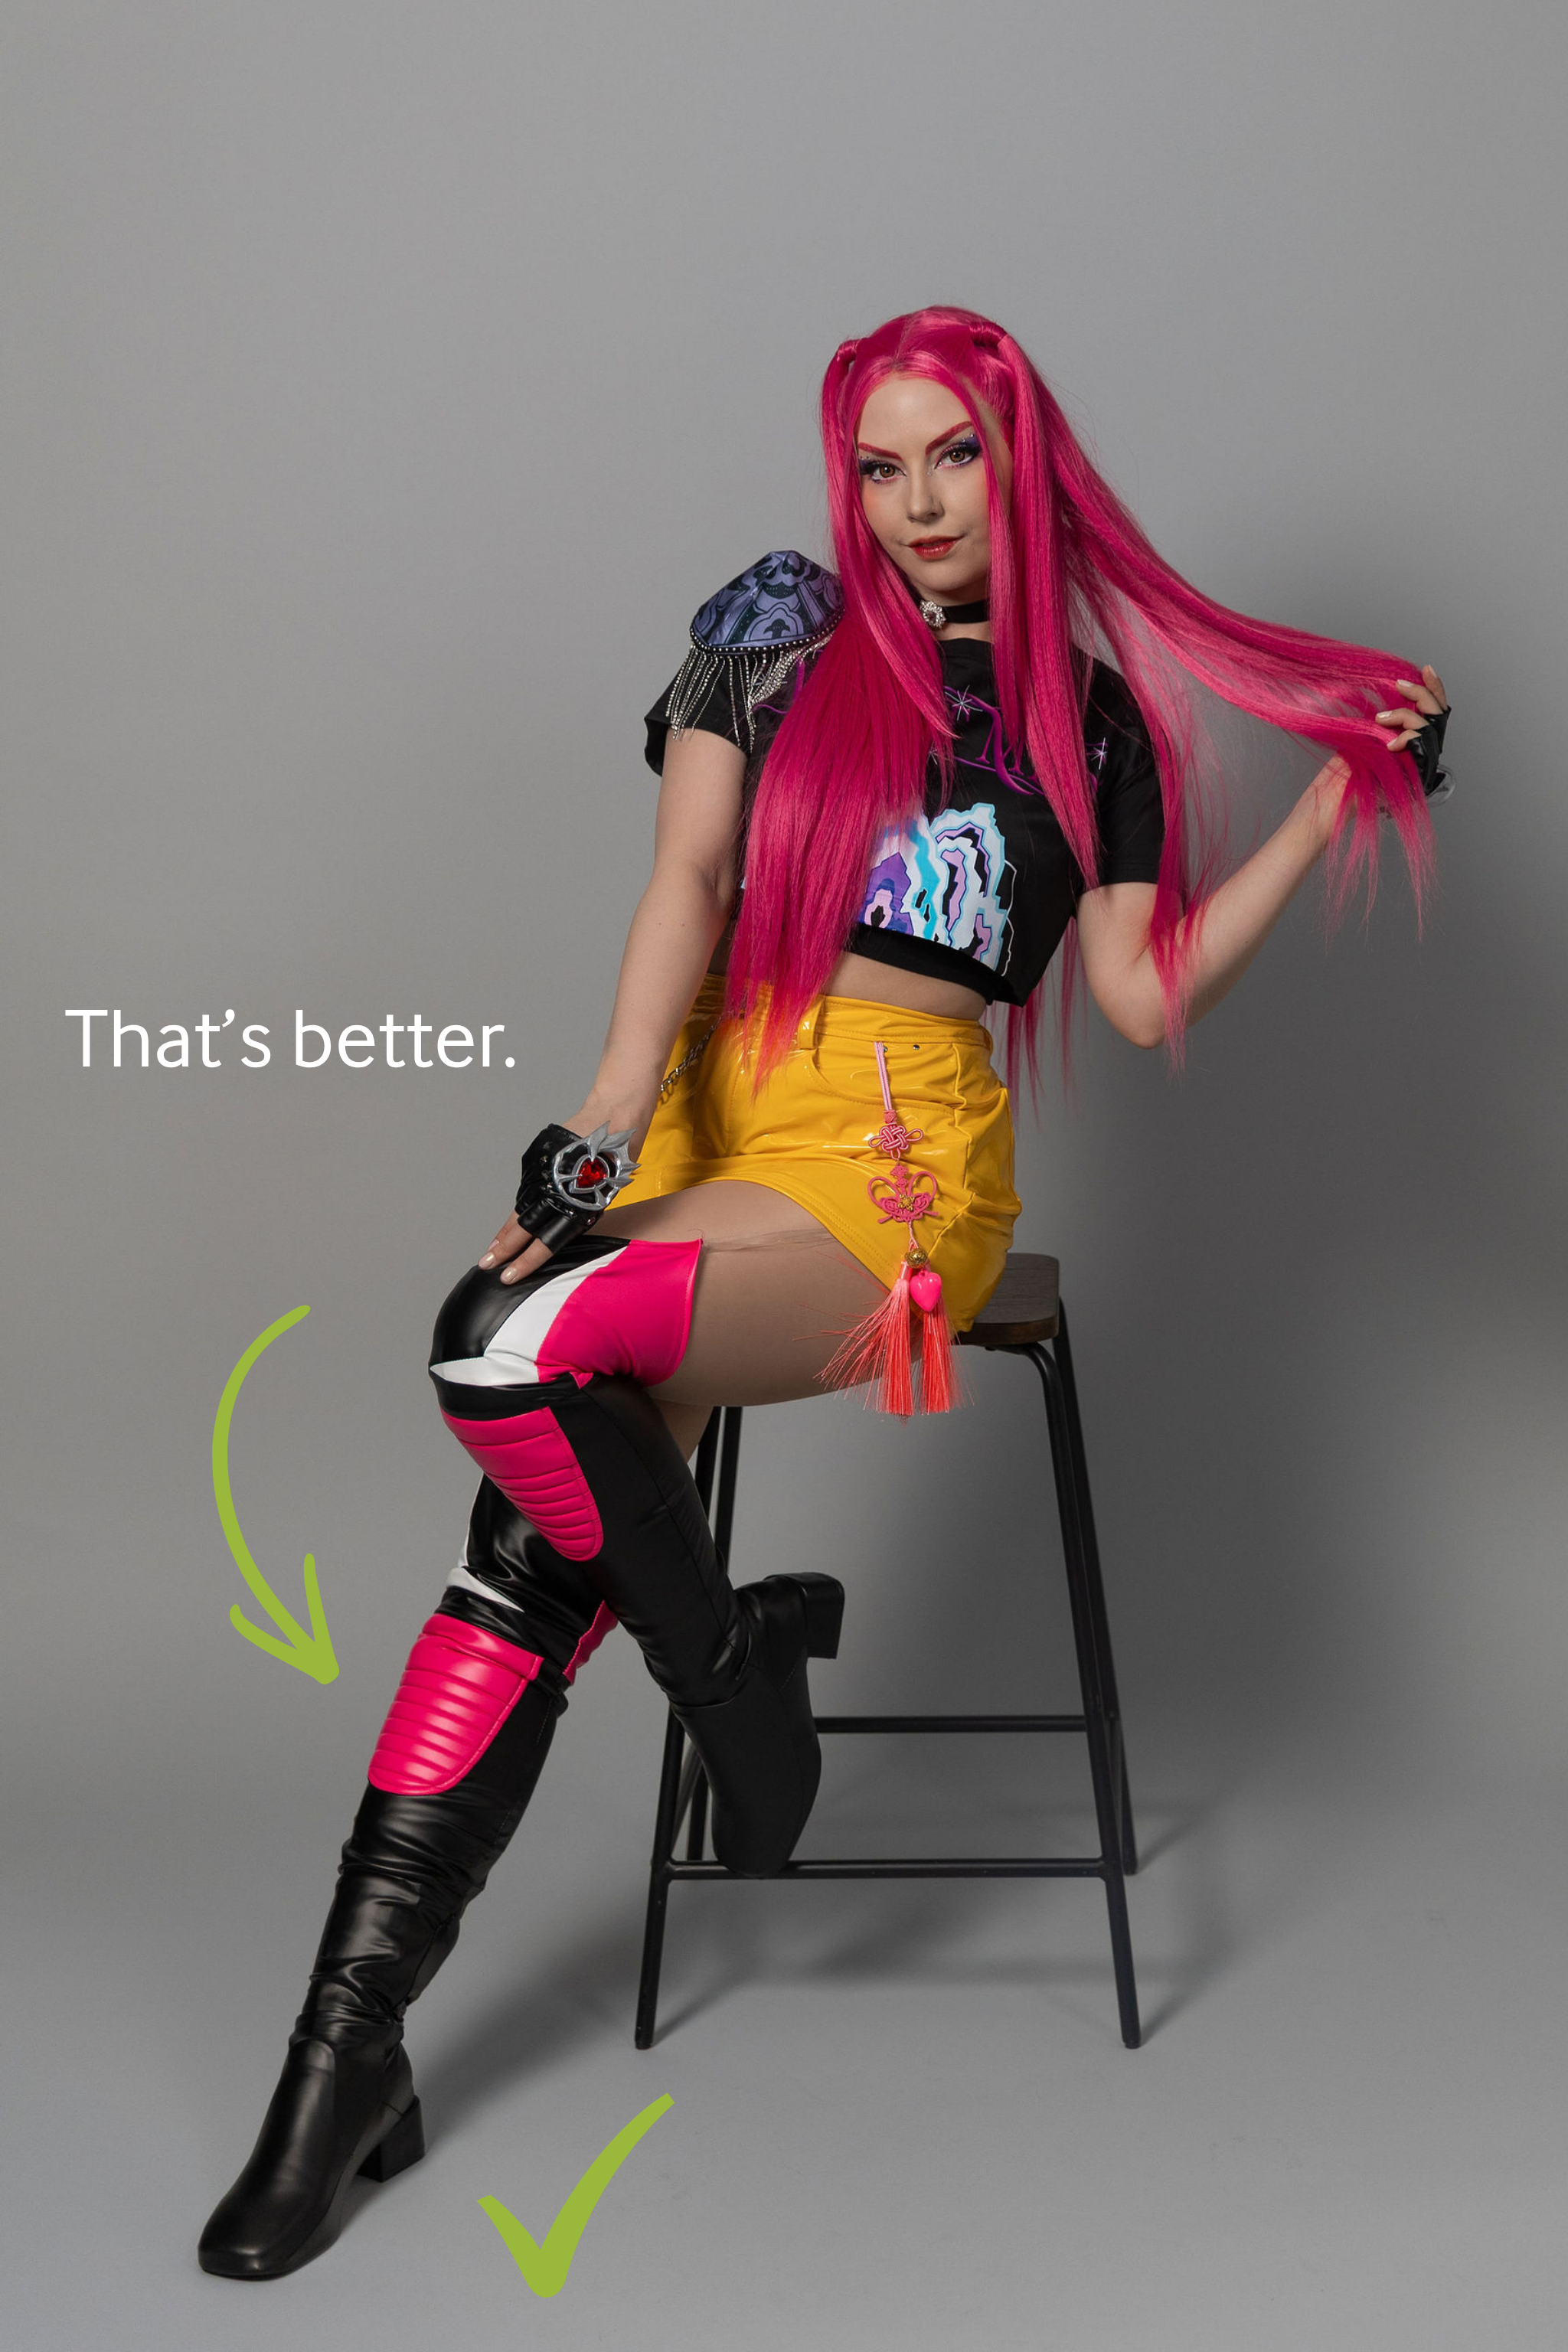
Be Mindful of Framing
There’s no floor marker, so it’s easy to accidentally step slightly out of frame.
I had a few shots where a hand, elbow, foot, or prop got cut off, so it’s worth checking the preview screen regularly as you shoot.
But the good news is, no matter how close or far you stand from the camera, it will auto-focus on you so you’re not blurry!
Tips for Your First Selfie Studio Shoot
If you’re planning to try Selfie Lab, here are a few things I learned:
Come mostly ready
The bathrooms are shared with the other businesses in the building, so it’s easier if you just need to do final touches in the studio (I only had to change out of my driving sweat pants and into my skirt once I got there. Also, bring clean shoes to wear… you don’t want mud or rain showing up on your photos or to make a mess of the clean studio).
Plan a few poses and props ahead of time
This saves time and helps you avoid decision fatigue once the clock starts. Plus props help with that awkward feeling of, “What do I do with my hands???”.
Think about the clicker
It sounds small, but figuring out how to hide it will make a difference in your final photos.
Start with your must-have shots
The hour goes by quickly, so get your key shots first, then experiment.
Keep an eye on your framing
It’s easy to drift out of frame without realizing it.
Some of My Fave Shots From This Session
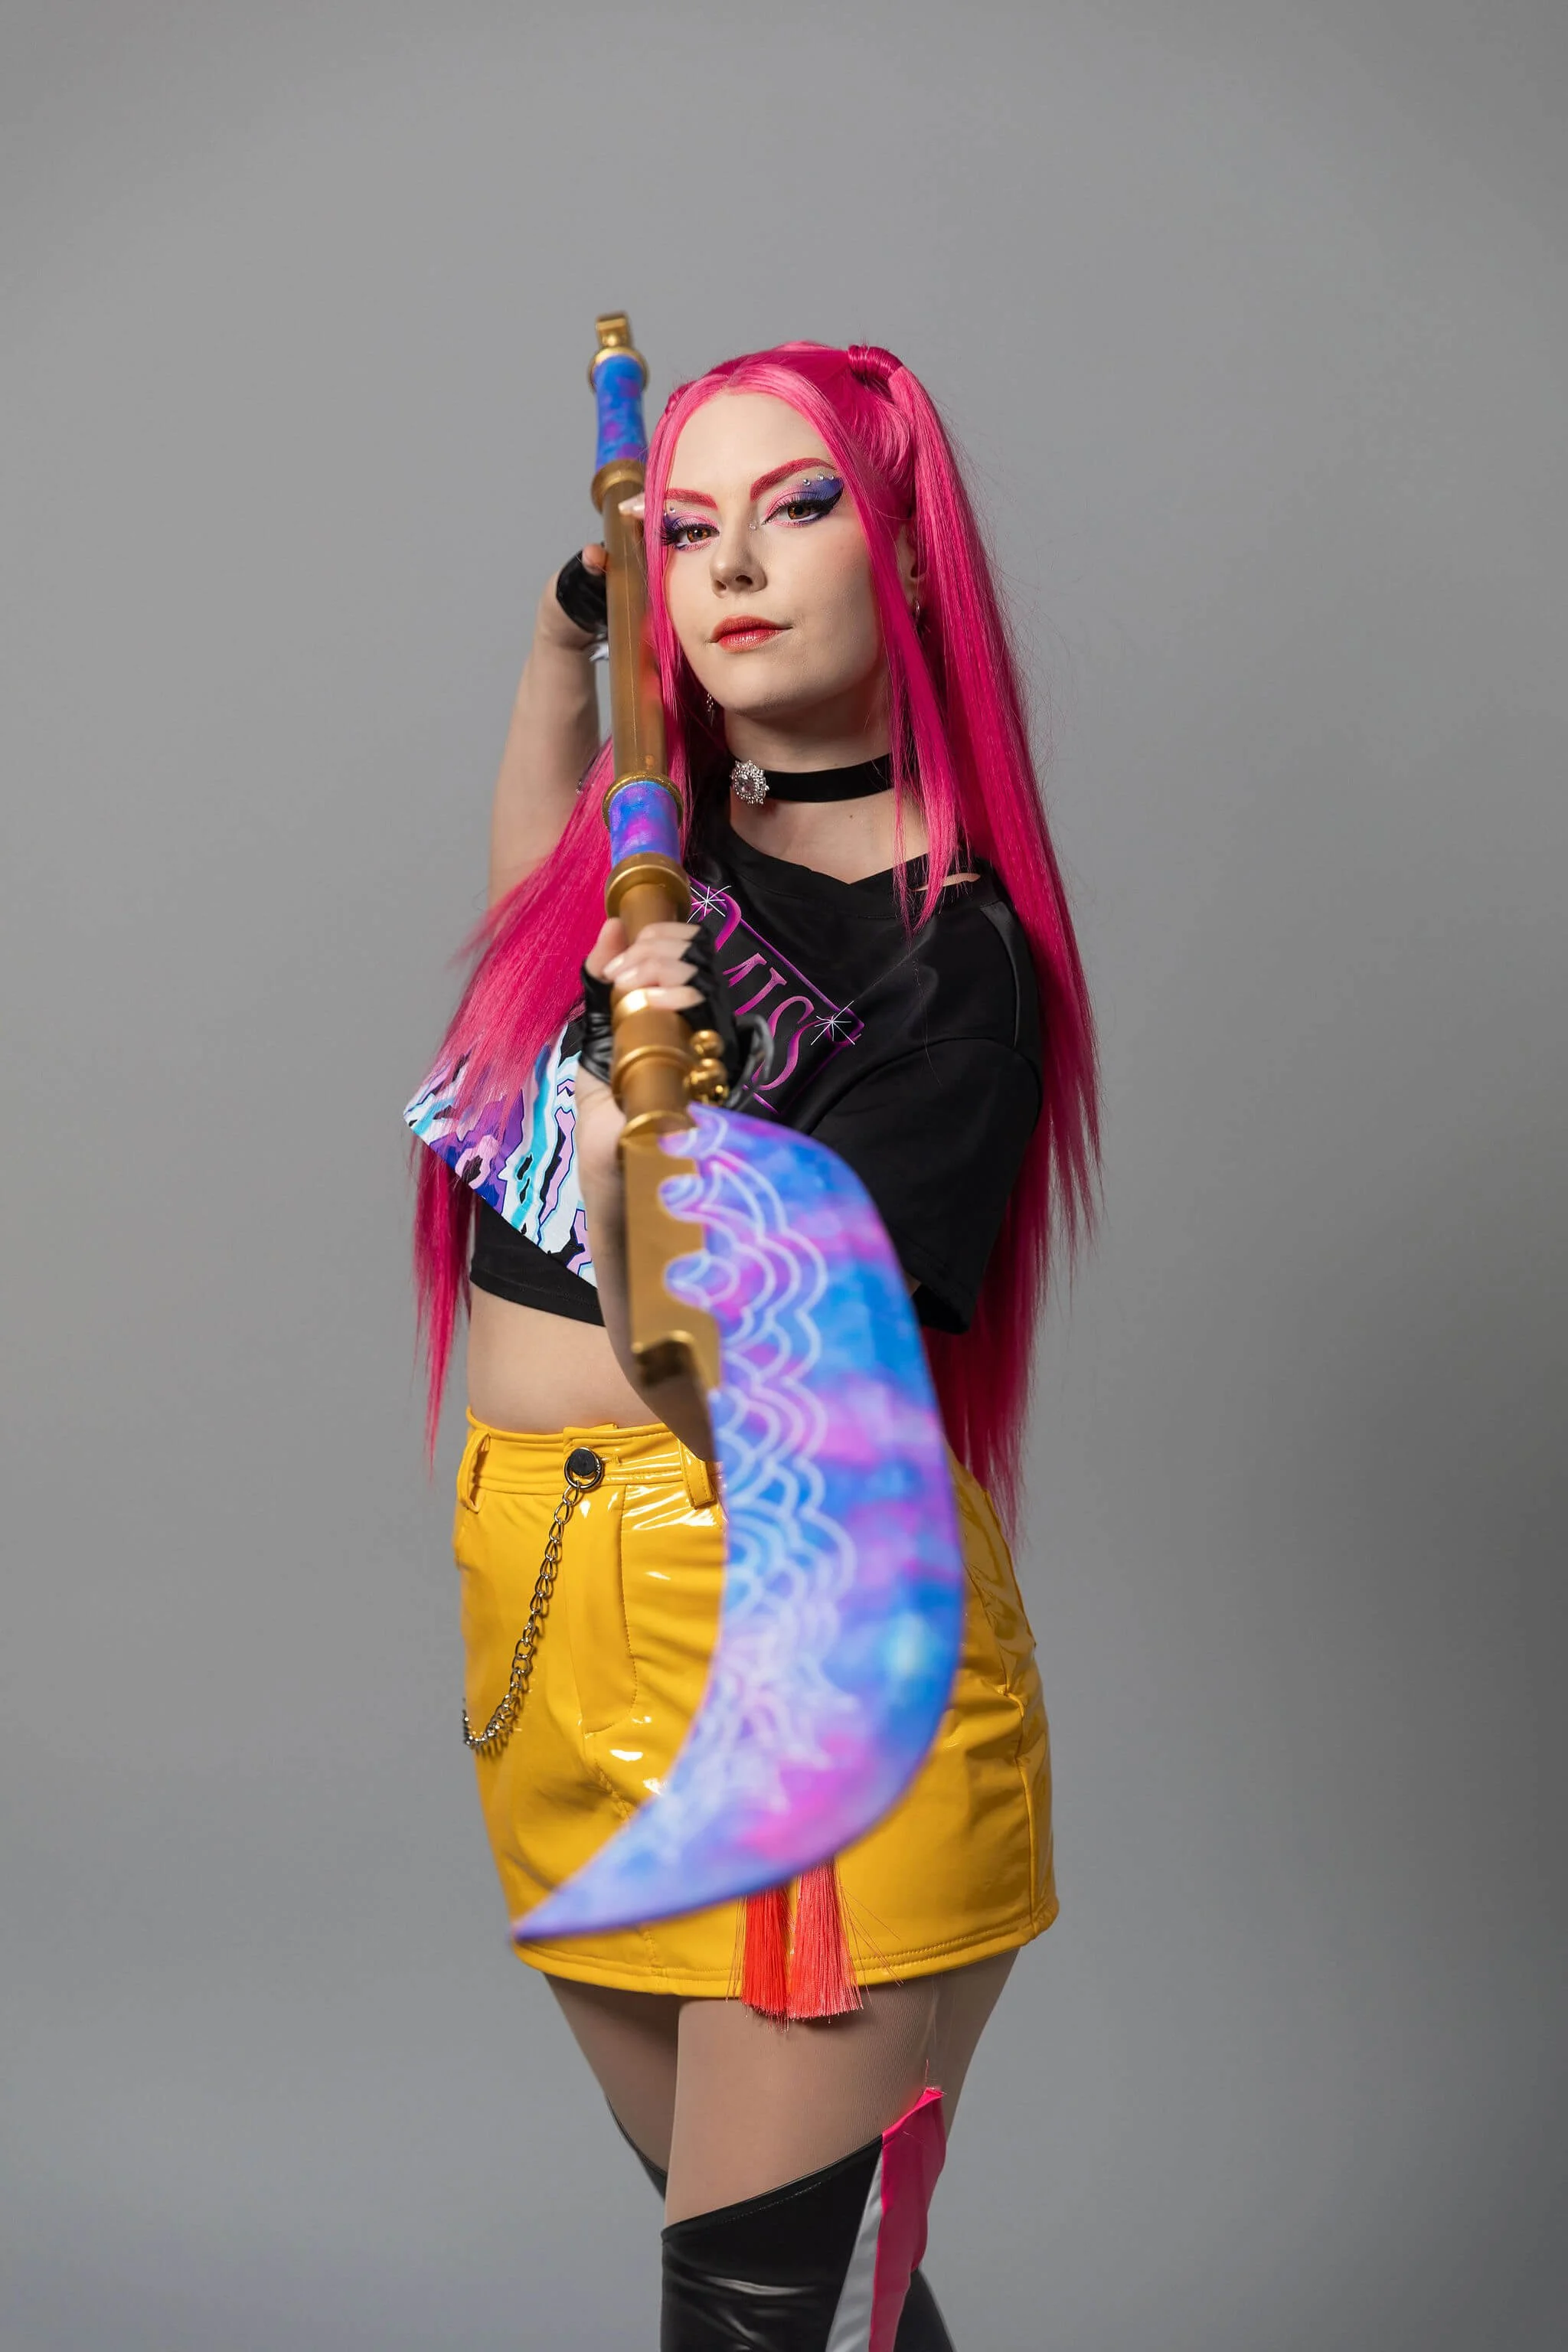
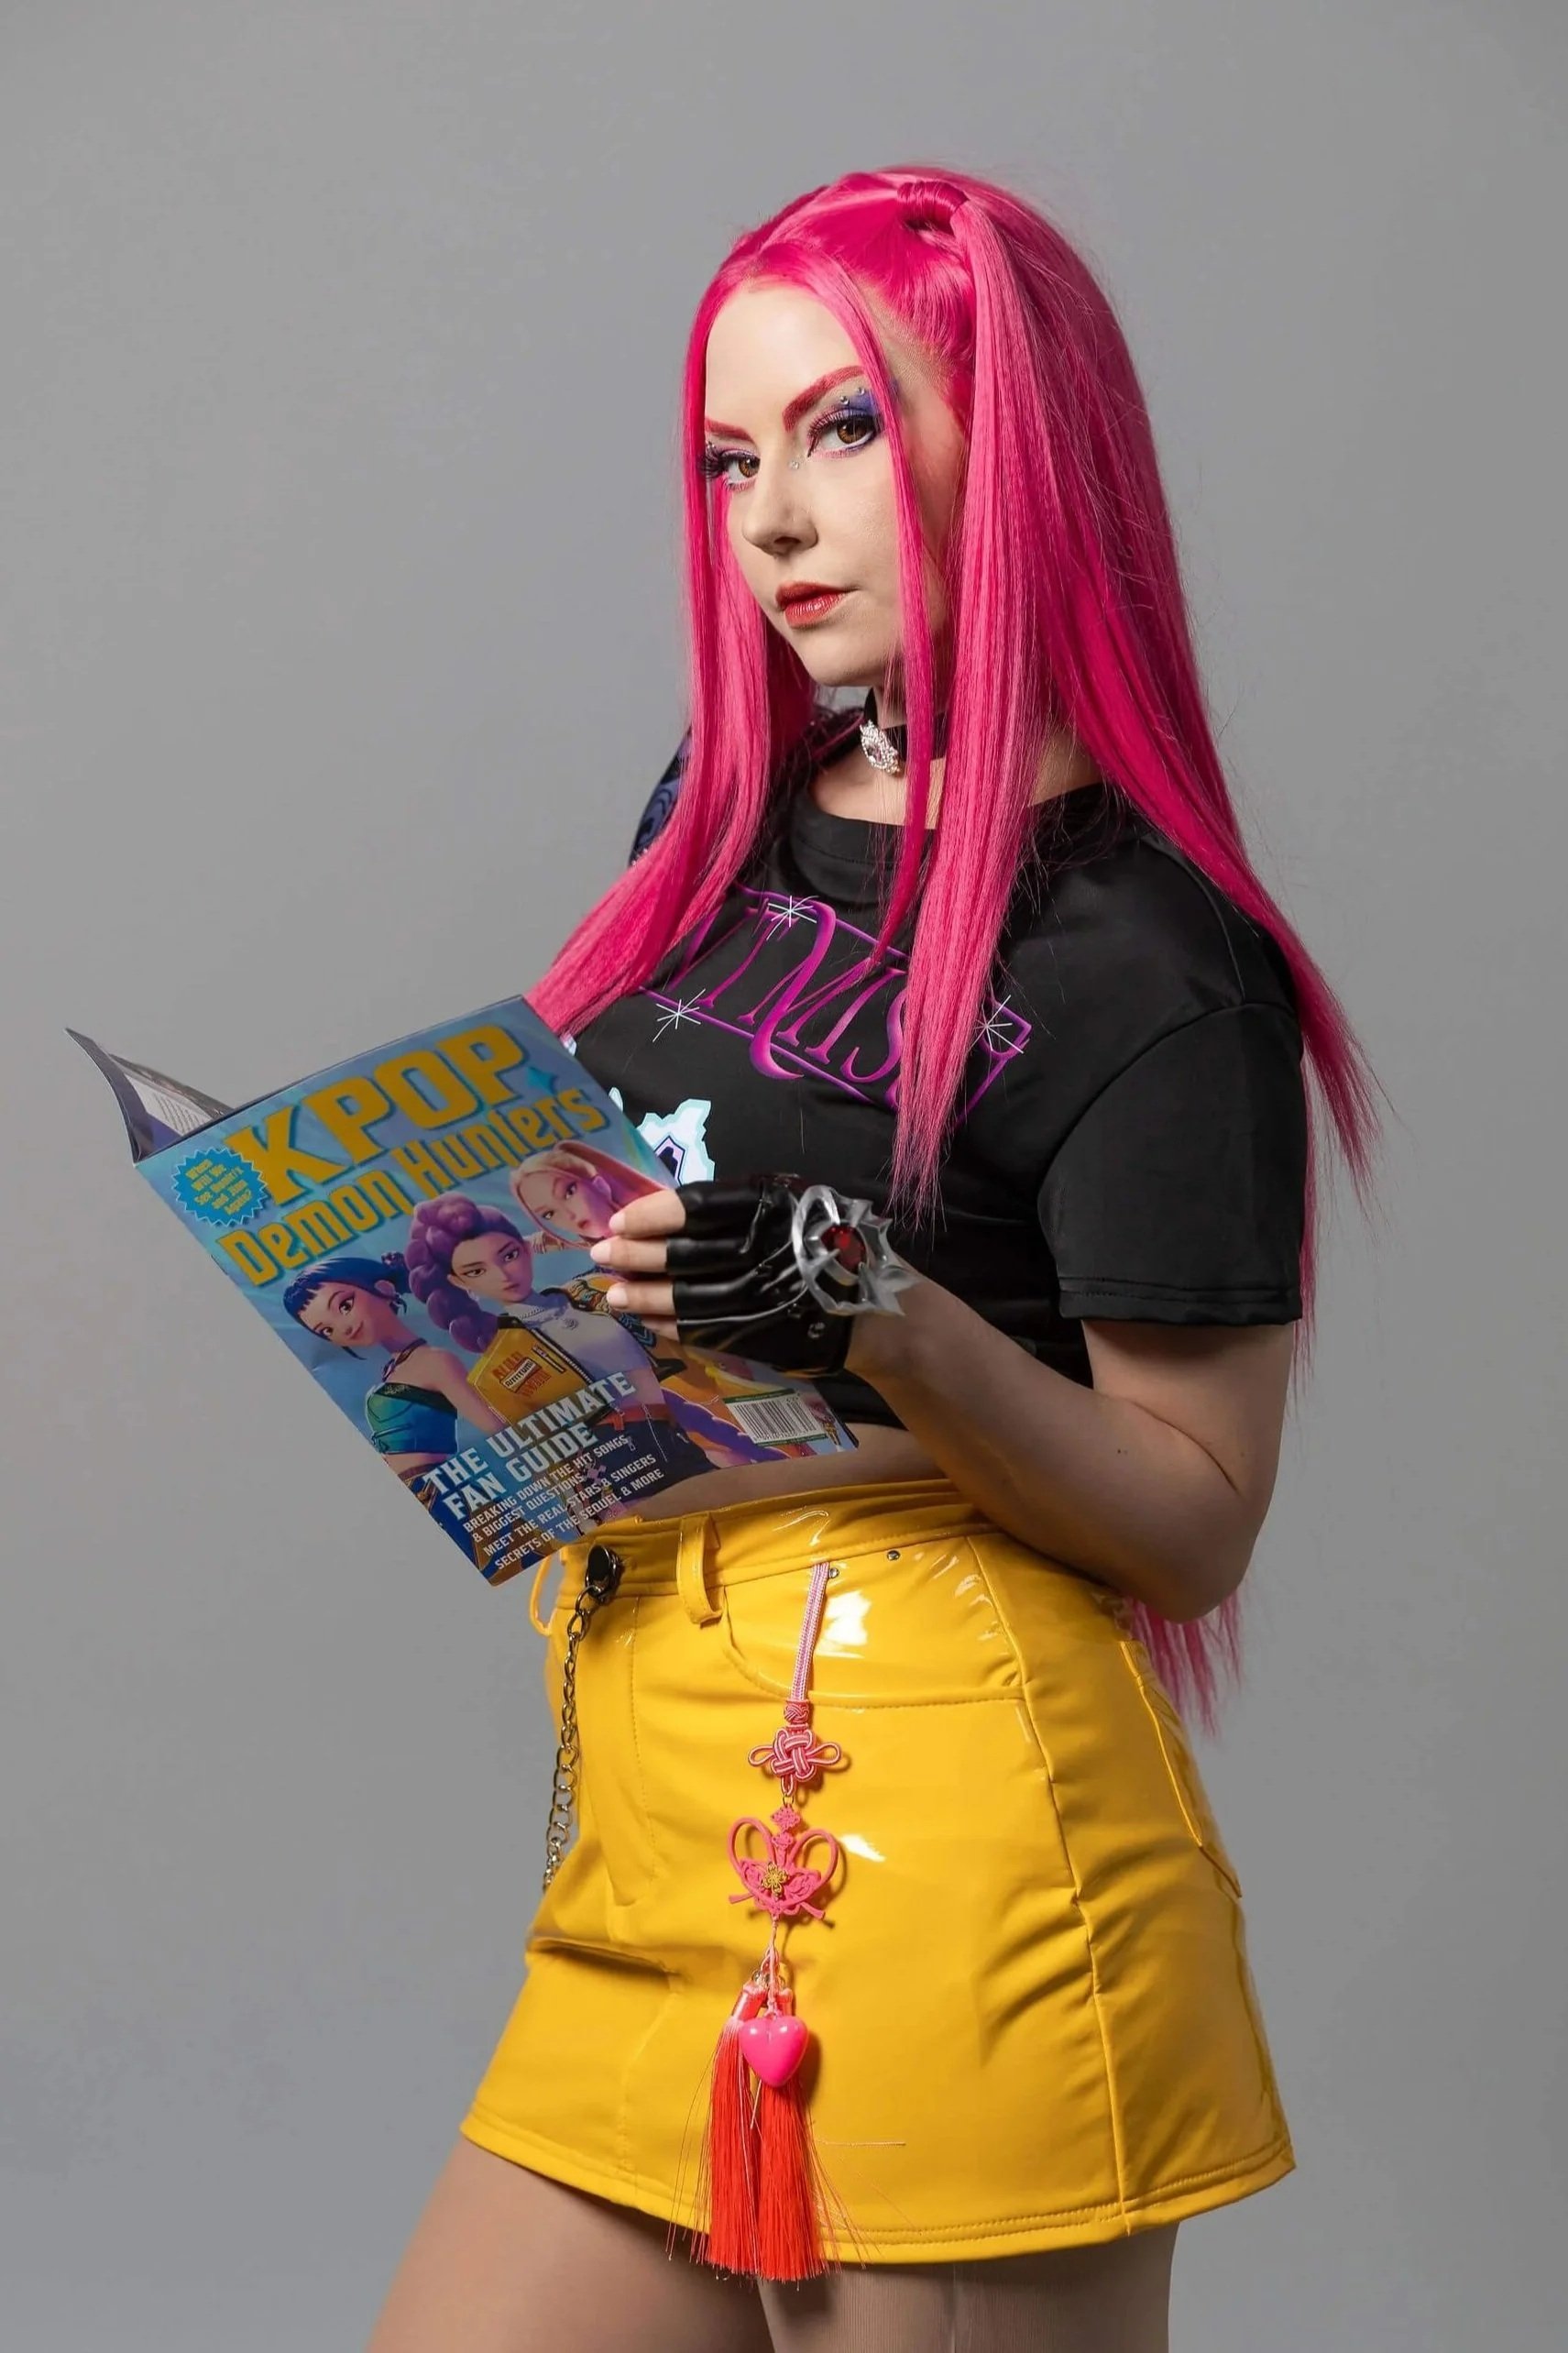


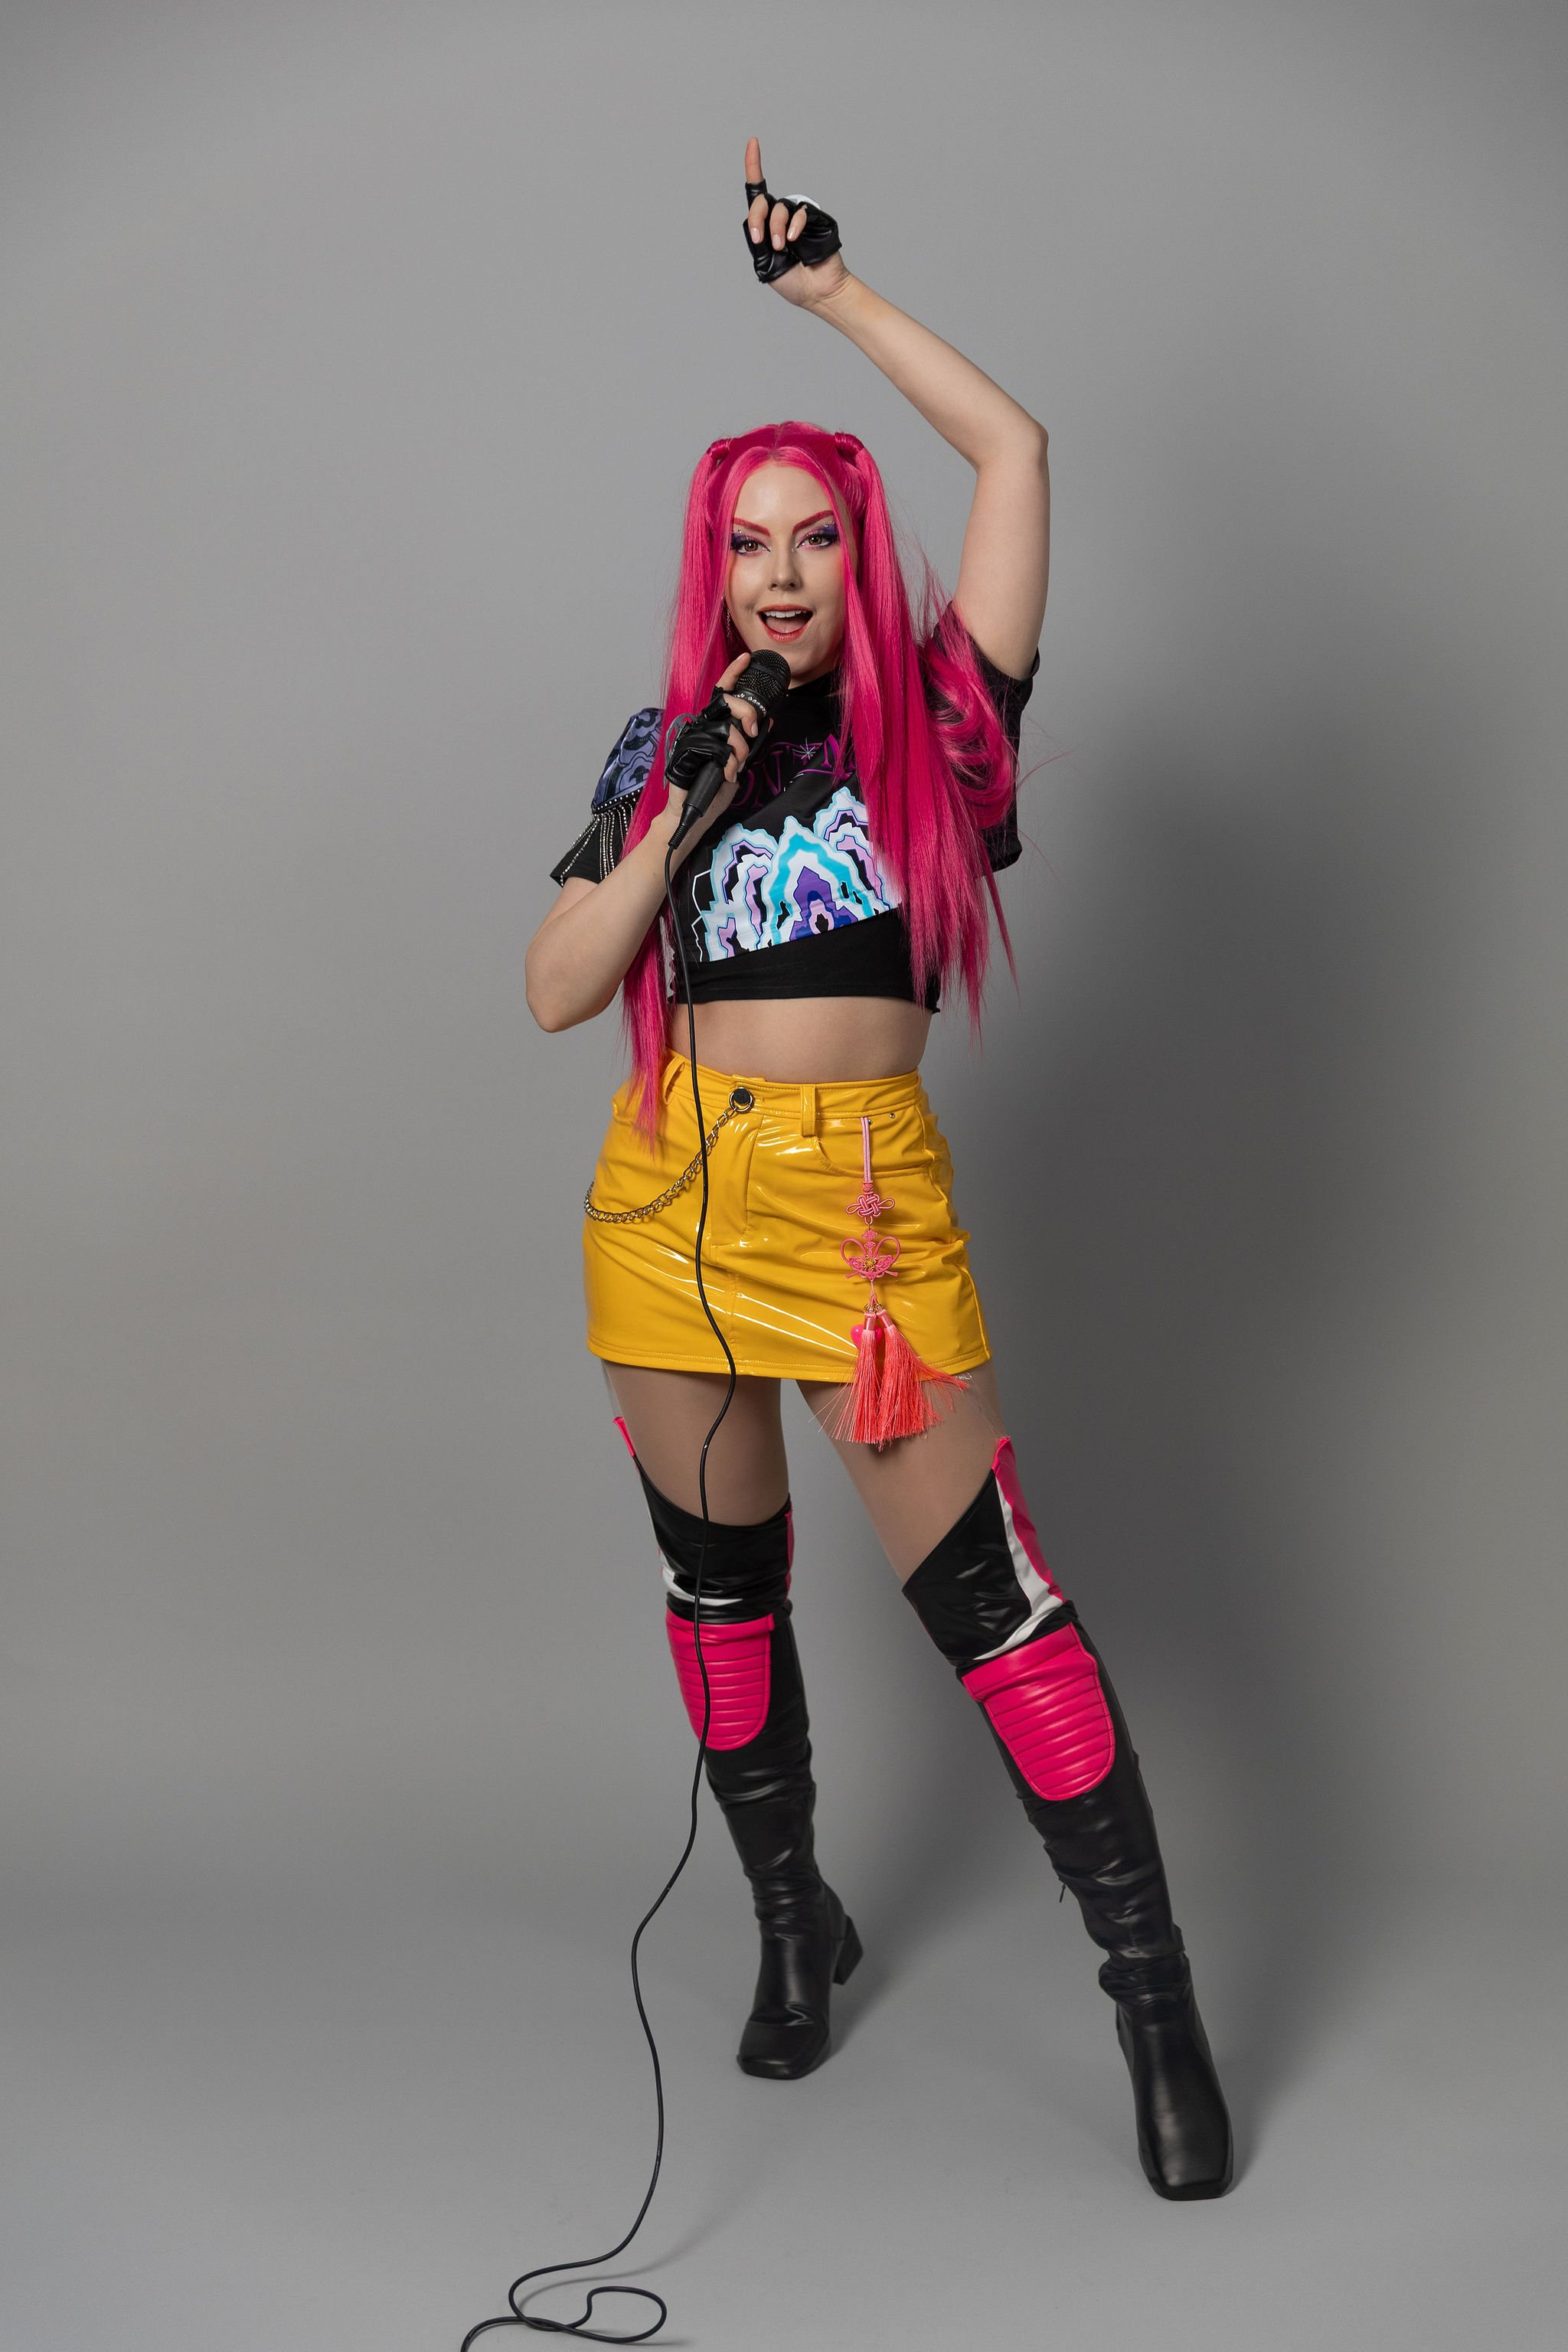
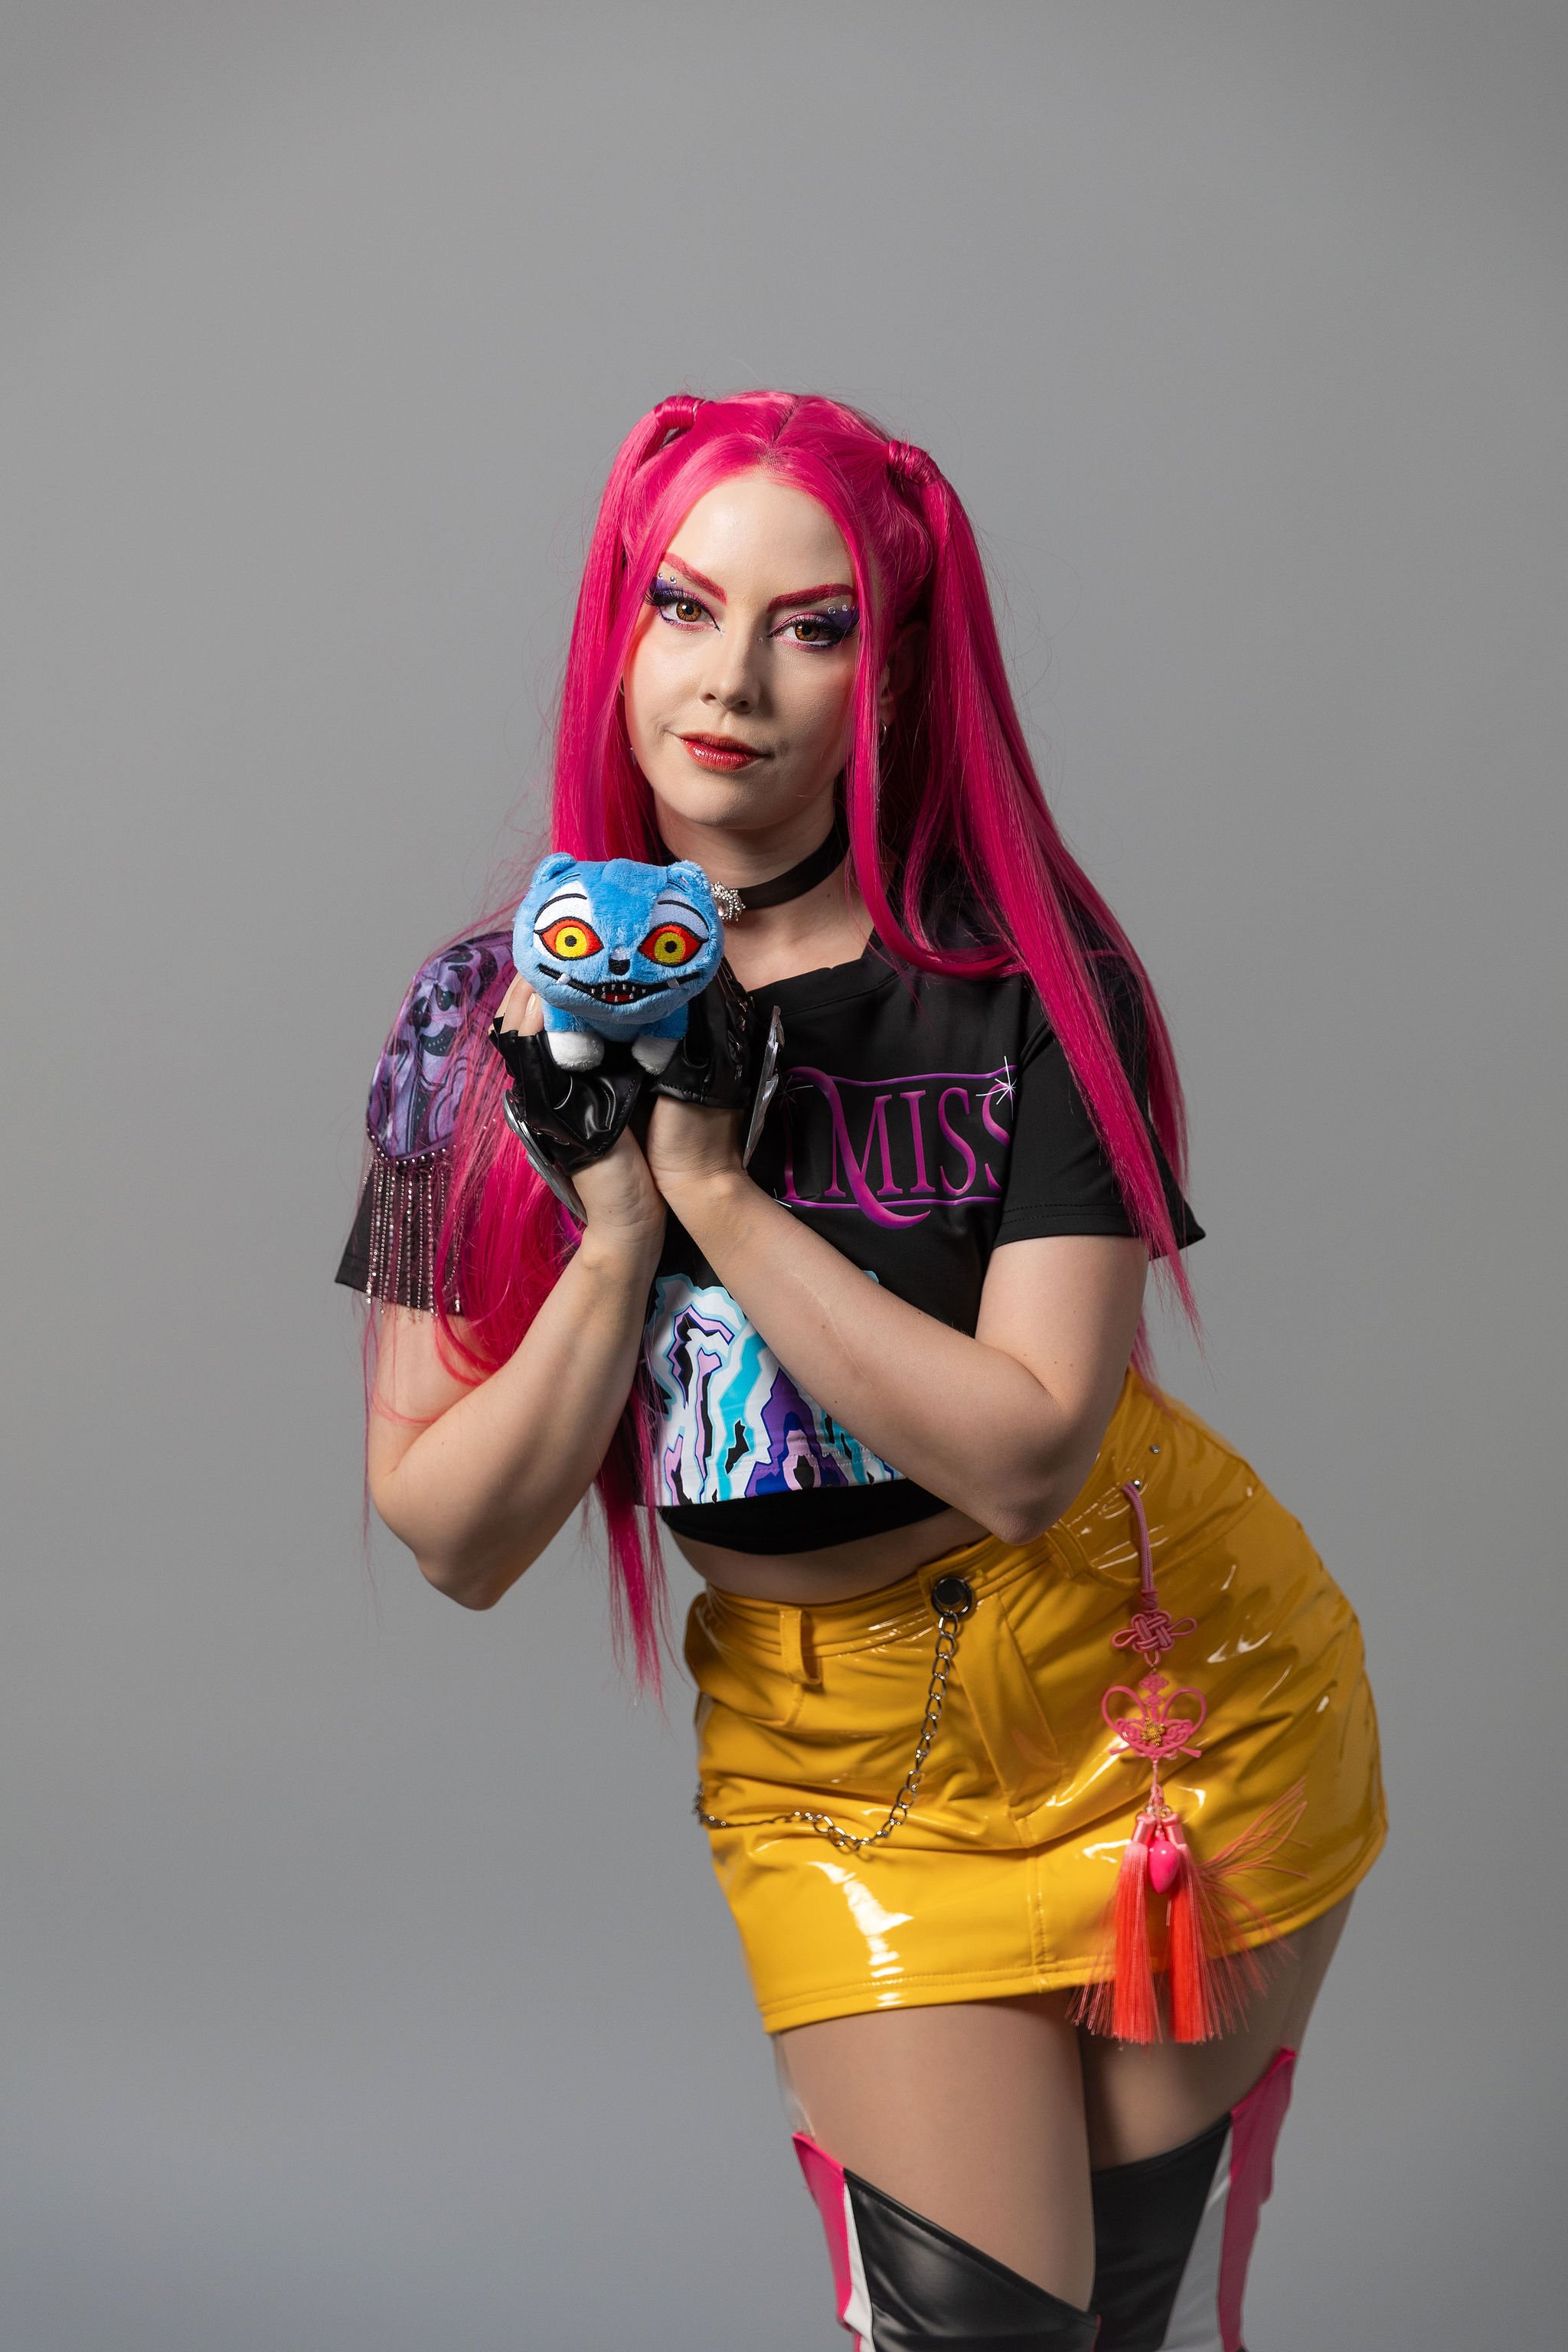


These were all shot completely solo using the in-studio mirror setup, no photographer needed (it was so hard to choose my faves… there’s dozens more that I love!).
Is Selfie Lab Worth It for Cosplayers?
I’d rate my experience a 9.5/10!
It was FUN, flexible, beginner-friendly, and really efficient… and I loved the results!
If you’re looking for:
A low-pressure way to get cosplay photos that you can use freely
A space to experiment and build confidence
A simple alternative to booking a photographer
A way to get photos all year round, even when it’s raining! (Which it does a lot in Vancouver)
This is a really solid option.
Who I’d Recommend This For
Cosplayers (especially if you’re still getting comfortable in front of the camera)
Content creators who want quick, clean studio shots
Anyone needing headshots or brand photos for their website or socials (like LinkedIn)
Small friend groups or even families looking for something different as a special gift or memory
Expecting mothers for comfortable and safe maternity photos
I even saw that people can bring their pets in!
Final Thoughts
I didn’t expect to get that into the flow of the shoot, but once I did, the hour went by FAST.
There’s something really empowering about being fully in control of your photos from start to finish.
As someone who works in both content creation and cosplay, I really appreciate when a space is designed with creators in mind, and this definitely felt like one of those experiences.
If you’ve ever wanted to practice posing without anyone watching you, this is exactly that. Plus the photos are yours afterwards!
So what do you think… would you try something like this? Let me know in the comments below! (Also drop your questions down there too and I’ll be happy to answer them).
PS. If you liked this kind of behind-the-scenes review, I’ve also shared my experiences at a couple of local conventions: